DIY Guides, Videos
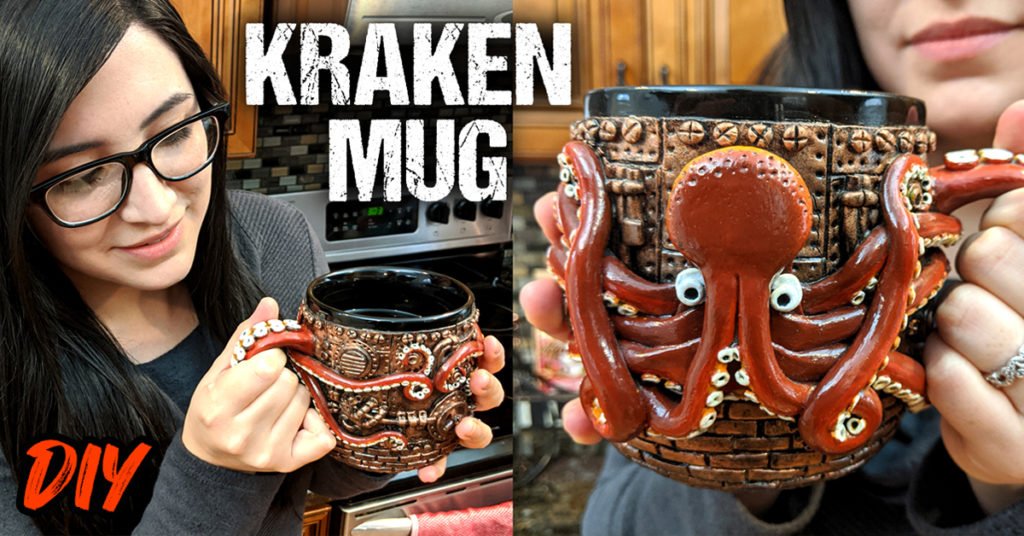
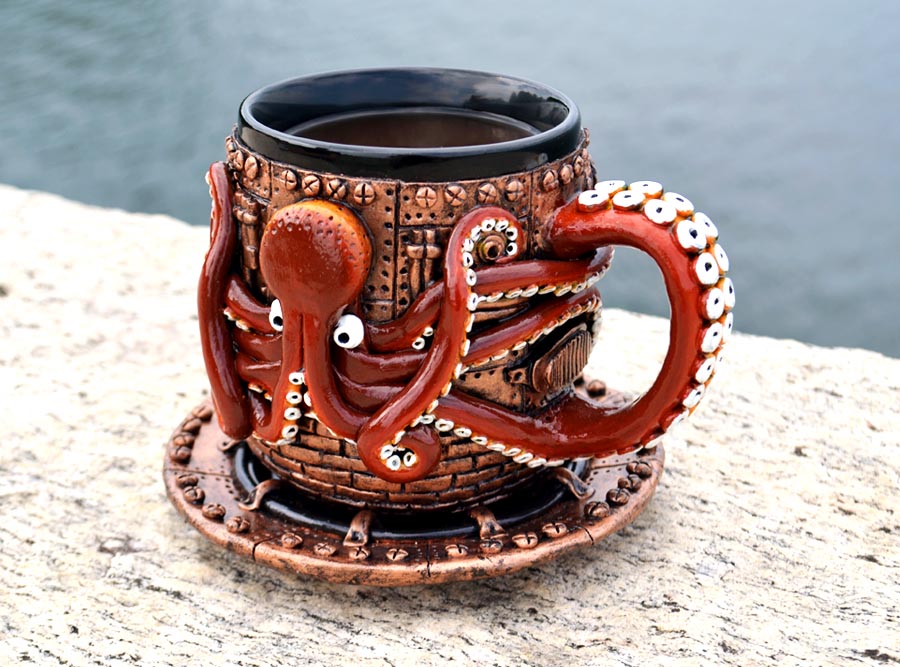
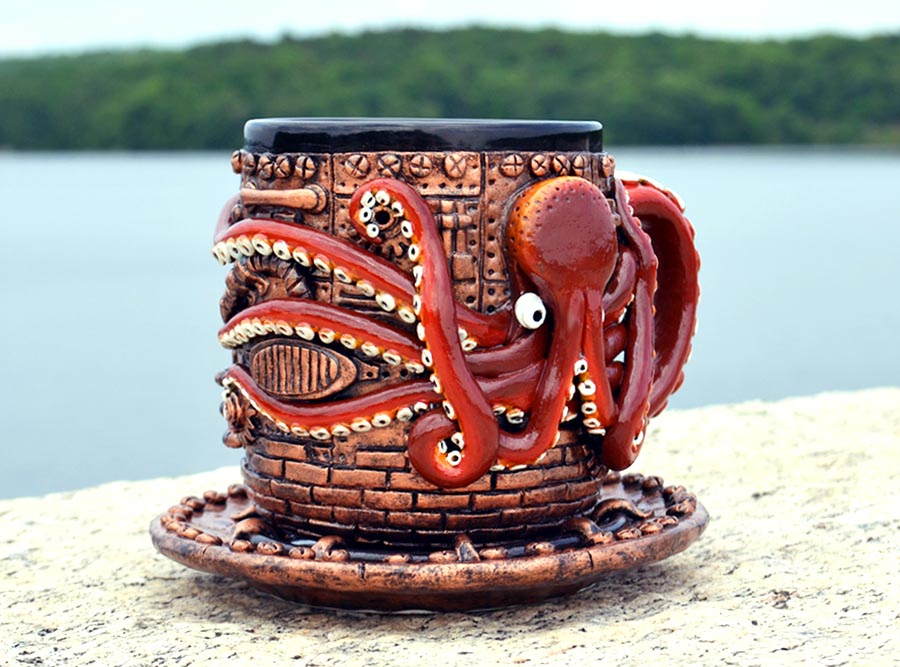
This is how I made my Steampunk Kraken Mug [DIY Guide]
Feb
Hey guys, welcome back! I?m finally going to show you how I made my favorite mug… I call it The Kraken Mug! I?m so excited to be sharing another one of my steampunk projects because my Steampunk Bag DIY Guide received so much love and I had a feeling you guys would like to have more steampunk fun. So here?s another exciting project and this one includes my favorite animal ?
You can either read the guide below or watch my YouTube video. Don?t forget to subscribe to my YouTube channel and turn on the notifications to get notified when the next video is up!
Tools & Materials:
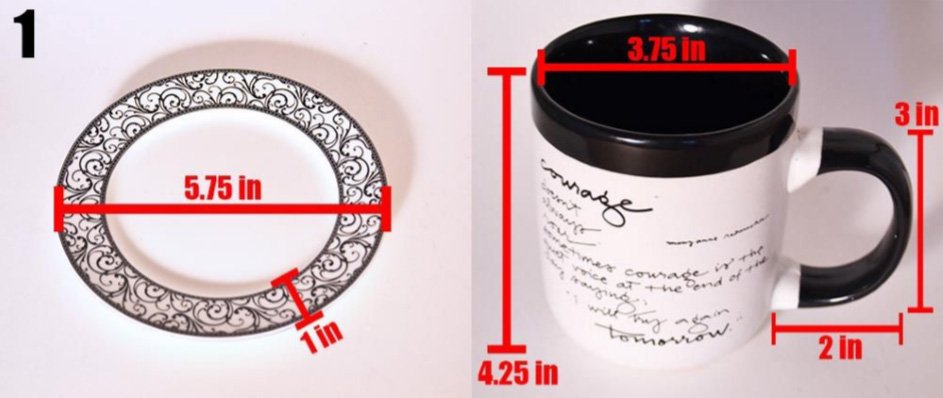
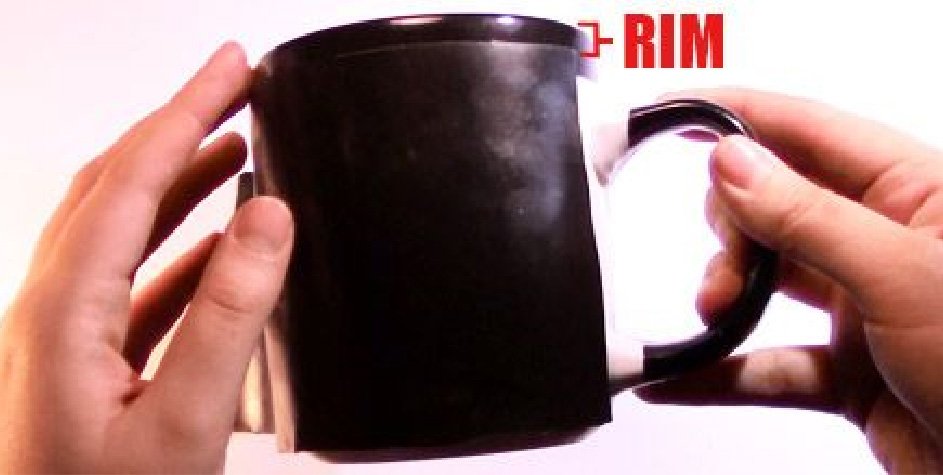
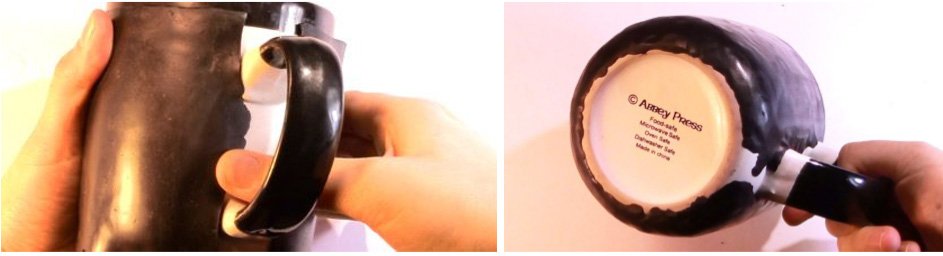
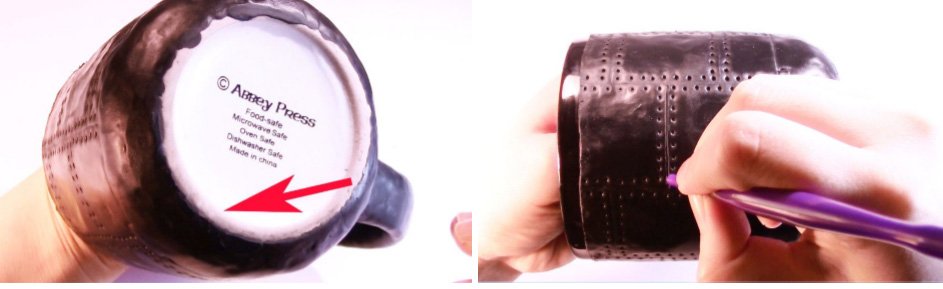
1. Mug & Plate (Any size) (You will need a mug and a small plate. A black mug is preferred, but it does not have to be completely black, it could just have a black rim and a black inside. The rim and the inside will not be modified because these are the parts that come into contact with food. I have provided the exact measurements of my mug & plate but this guide works for mugs and plates of any size)
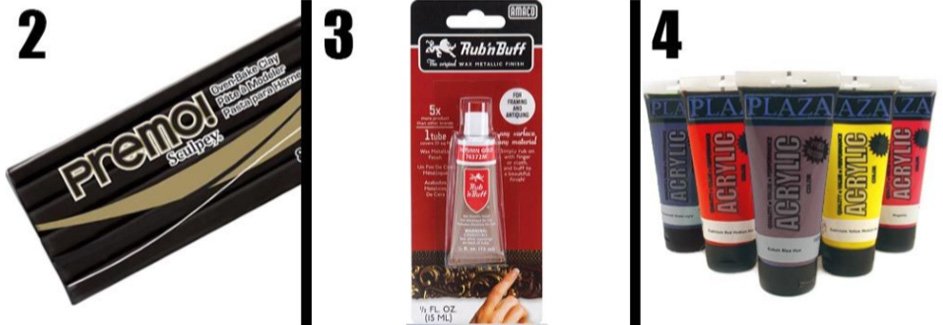
2. Black Premo! Sculpey Polymer Clay (8 oz) (You can find this clay in most craft stores)
3. Rub n? Buff Wax Metallic Finish (You need to get the color ?Autumn Gold? or any color that you prefer. If you cannot find Rub ?n Buff at your local craft store, use any other wax metallic finish)
4. Acrylic Paints (Any brand) (The colors that you will need are Orange, Red, Yellow, Brown, White & Black)
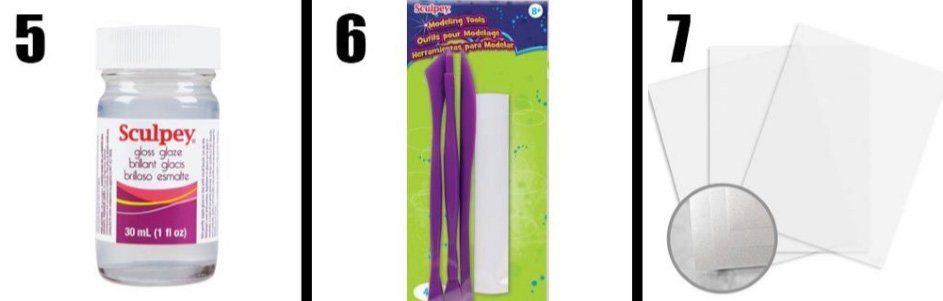
5. Sculpey Glazes (1 fl oz) (You need Sculpey ?Satin Glaze? and Sculpey ?Gloss Glaze?. If you cannot find these exact glazes, use any other brand of glaze that works on polymer clay)
6. Pack of clay modeling tools (You just need a simple pack of modeling tools that has at least one flat tool, one pointed tool and one roller. You can find these packs at any craft store)
7. 3 Translucent Papers (You can find these in a pack at any craft store)
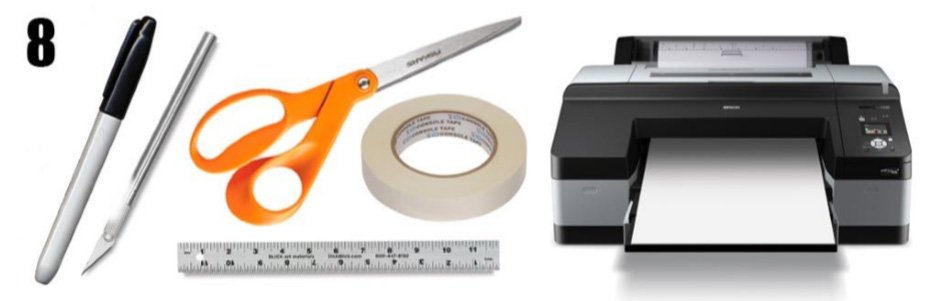
8. Some things you might already have? (Permanent marker, X?Acto knife, Ruler, Scissors, Tape, 2 sheets of computer paper and a printer)
9. Painting Materials:
- A mixing palette
- A paint mixing tool
- 2 small size brushes
- 3 medium size brushes
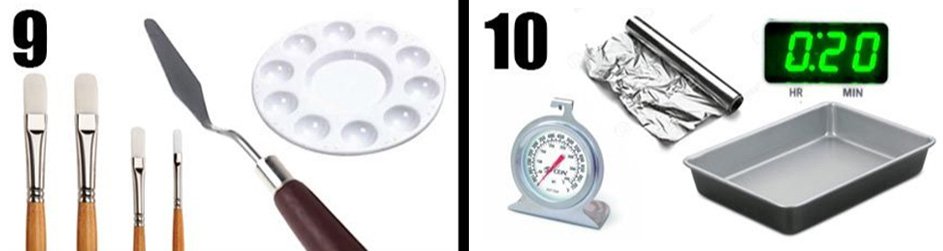
10. Baking Materials:
- An oven (Polymer clay is completely safe and it does not release any toxic fumes or leave any residue in your oven?)
- Metal or glass baking pan
- A sheet of aluminum foil
- Oven thermometer
- Oven timer
PART 1: Drawing Your Design
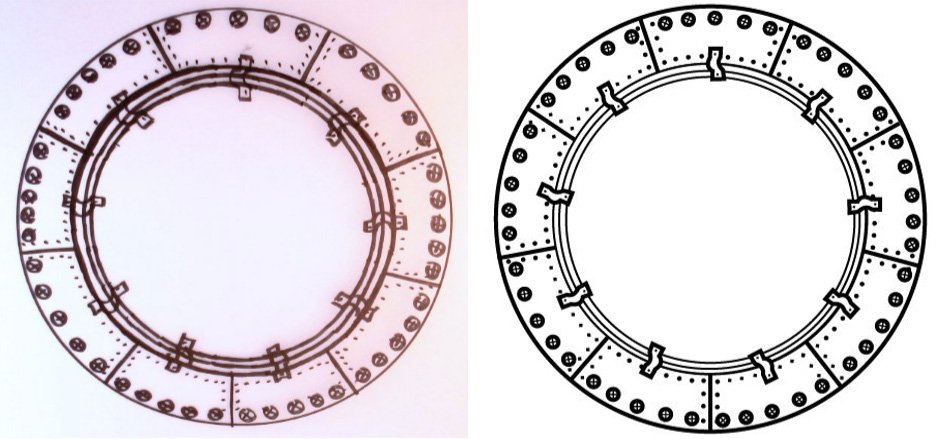
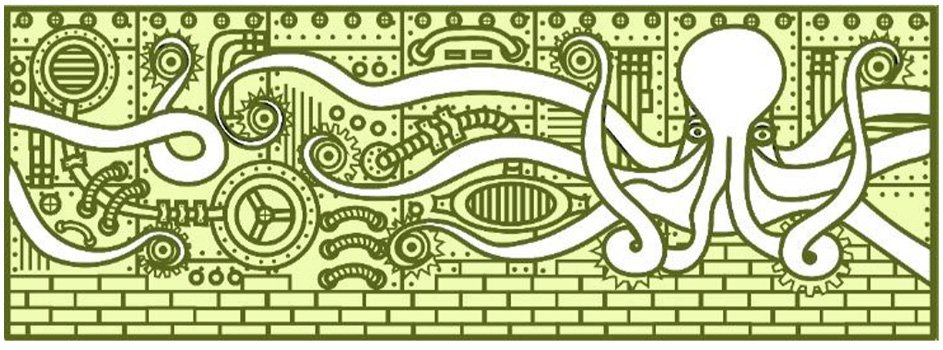
This part consists of the drawing of your mug & plate design. You will be drawing your mug design in three different layers by using the printable templates that will be provided to you in Step 2 (See pictures below).
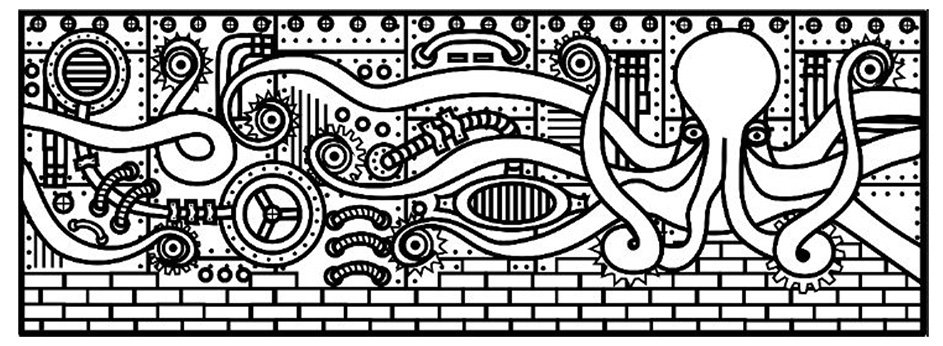
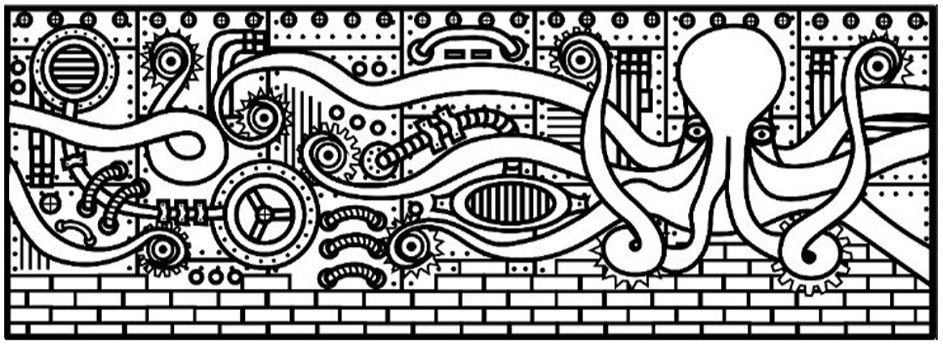
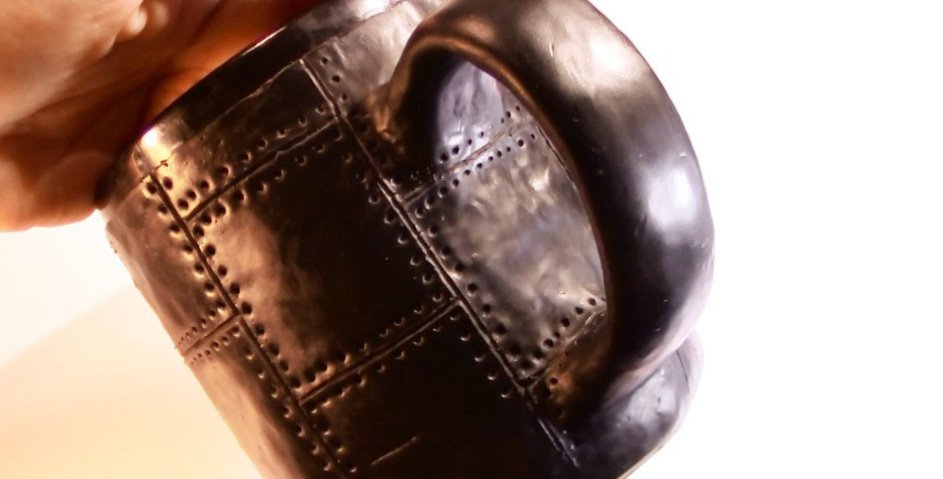
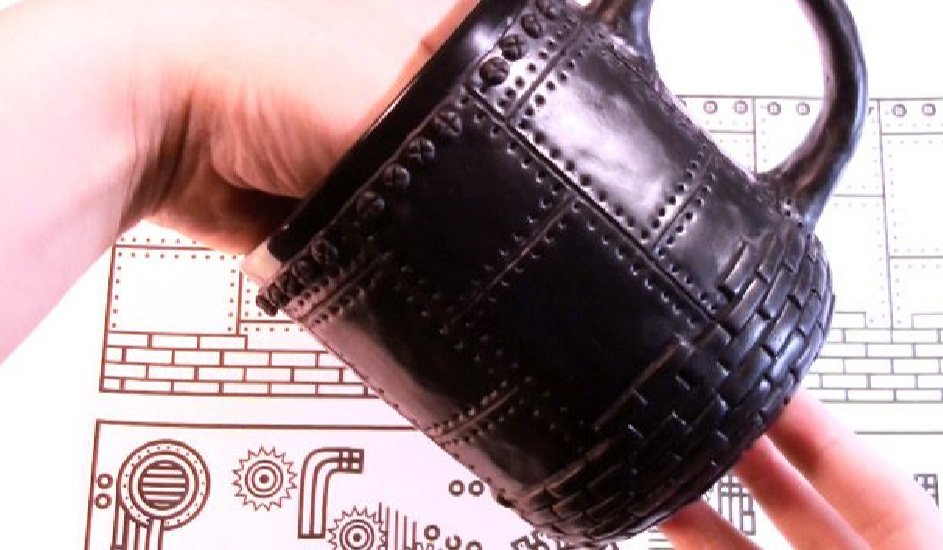
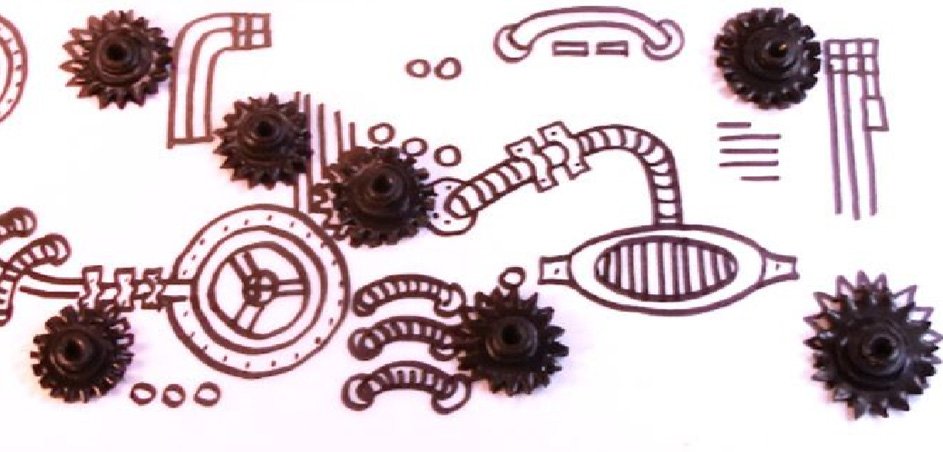
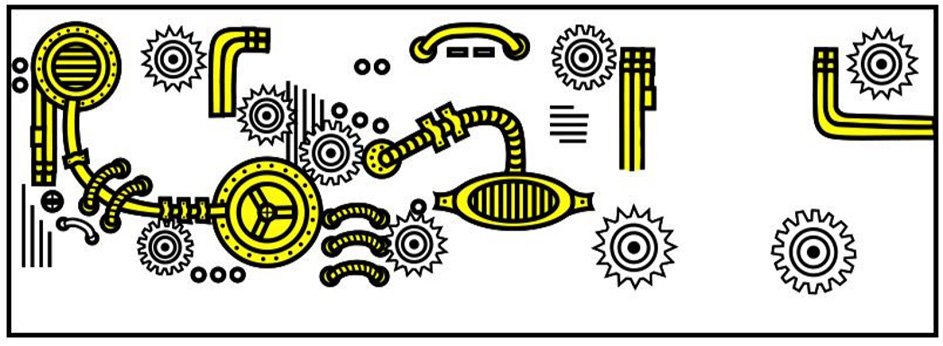
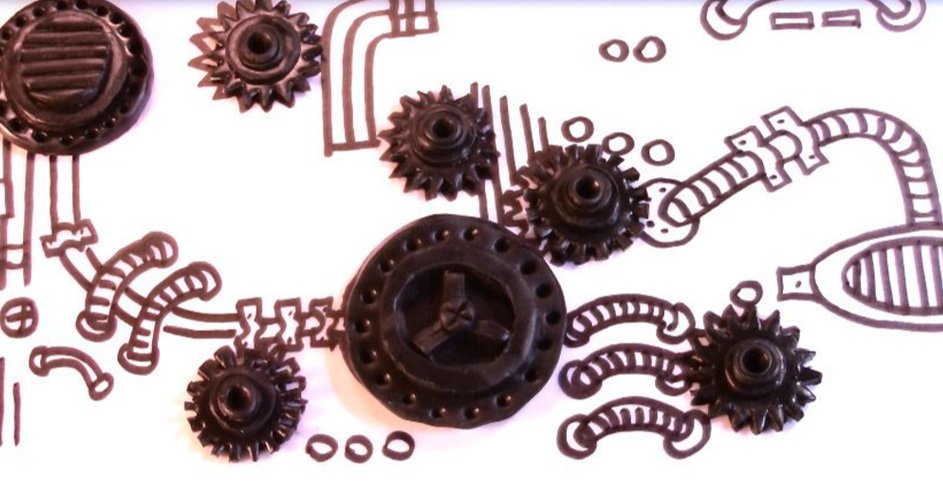
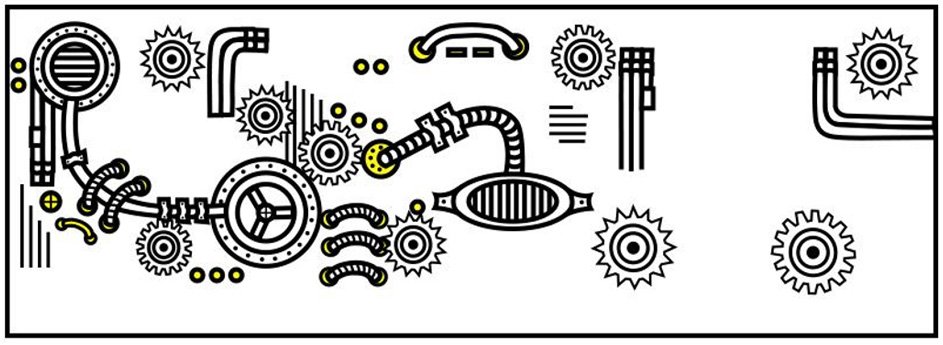
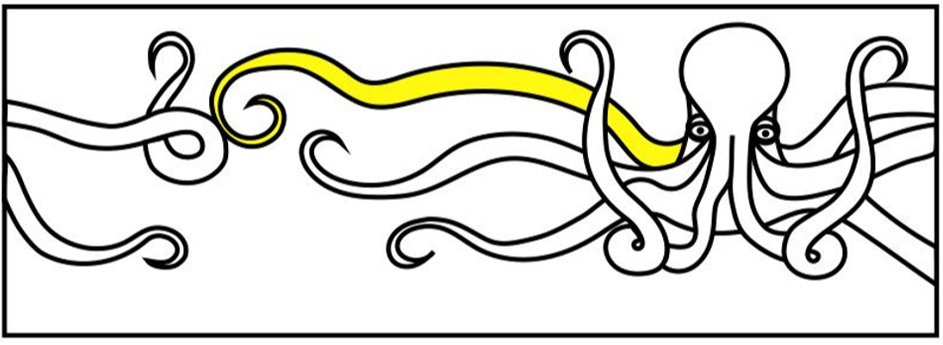
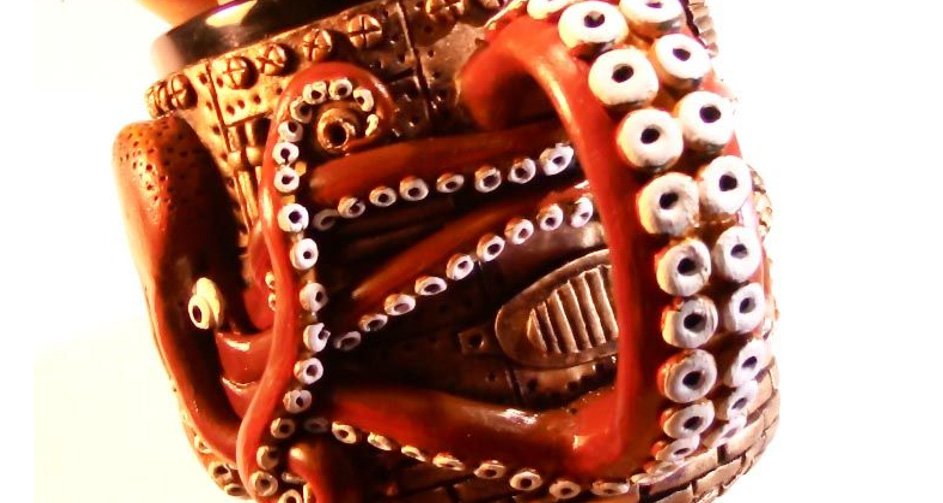
The goal is for you to combine these three layers to create a complete mug design that looks like this:
You will also draw a design for your plate (See picture below). Since there is a wide range of plate sizes, you will have to draw this design according to the measurements of your own plate. You will be drawing the design from scratch and without any templates. The good thing is that this design will not require more than one layer because it is not as intricate as the mug design.
Step 1: Gathering of drawing materials ?
The materials you are going to need for all of Part 1 are: a printer, 3 translucent papers, 2 computer papers, mug & plate, permanent marker, scissors and a ruler.
Step 2: Printing the mug templates ?
Click here and download these two files: ?Printable Mug Design Template Layer 1 & Layer 2? and ?Printable Mug Design Template Layer 3?. The templates are completely free!
You should use your computer paper for this and make sure your printer?s paper size is set to ?Letter? (8 ? x 11 in) for a perfect fit. You should now have these two printed images (See pictures below).? I will refer to the layers on these images as the ?white layers? throughout the guide.

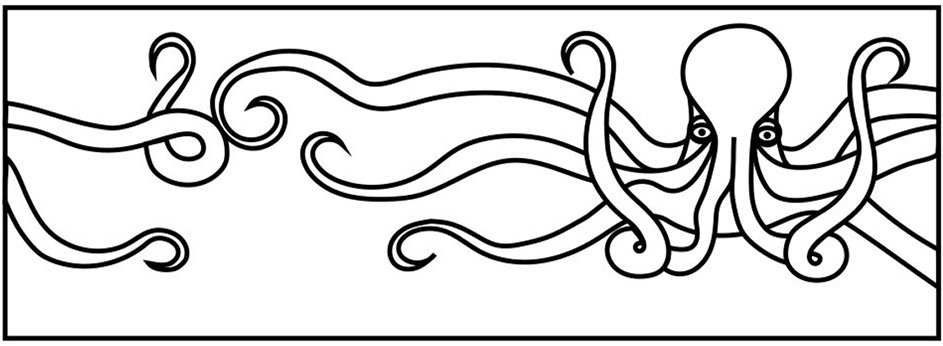
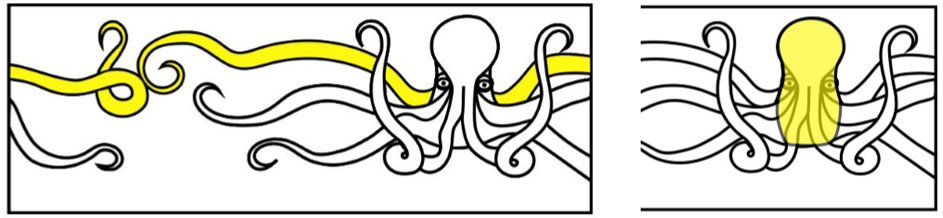
We will only be using ?white layer 1?, ?white layer 2? and ?white layer 3? for the rest of Part 1. This version of the octopus (See picture below) will be used later on in the guide.
Step 3: Tracing the mug templates ?
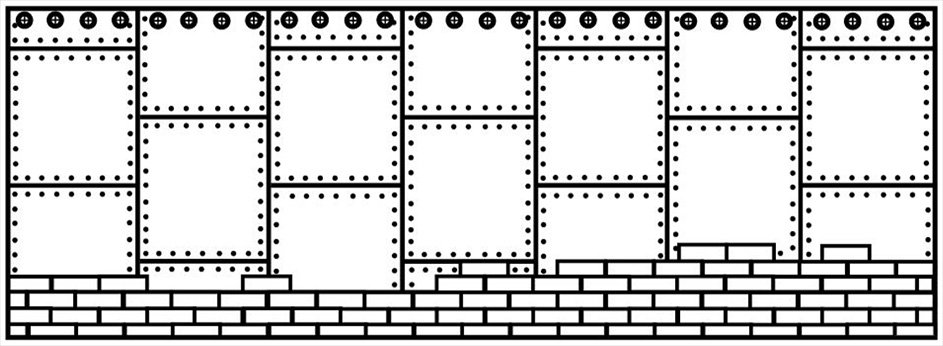
Now it is time to start drawing. Take one of your translucent papers and place it on top of ?Printable Mug Design Template ?Layer 1 & Layer 2?. Use your permanent marker to trace the entire drawing onto the translucent paper. Start by using your ruler to create the outside rectangles that make up ?white layer 1? and ?white layer 2? (See left picture below). Then, focus on each layer at a time without worrying about making the drawings look perfect (See right picture below). These ?translucent layers? will only be guides so it is okay to have some messy lines.
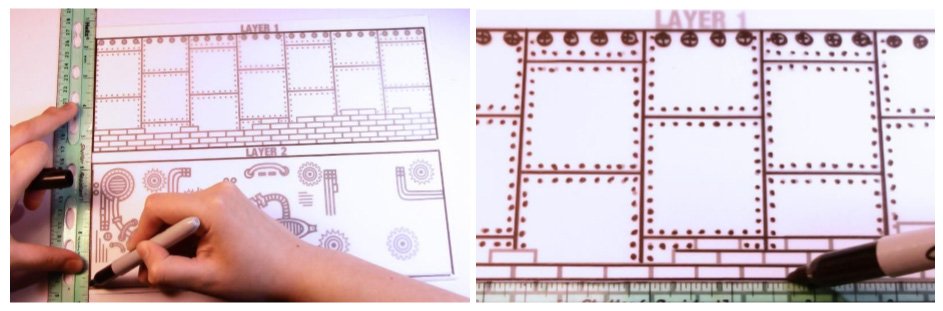
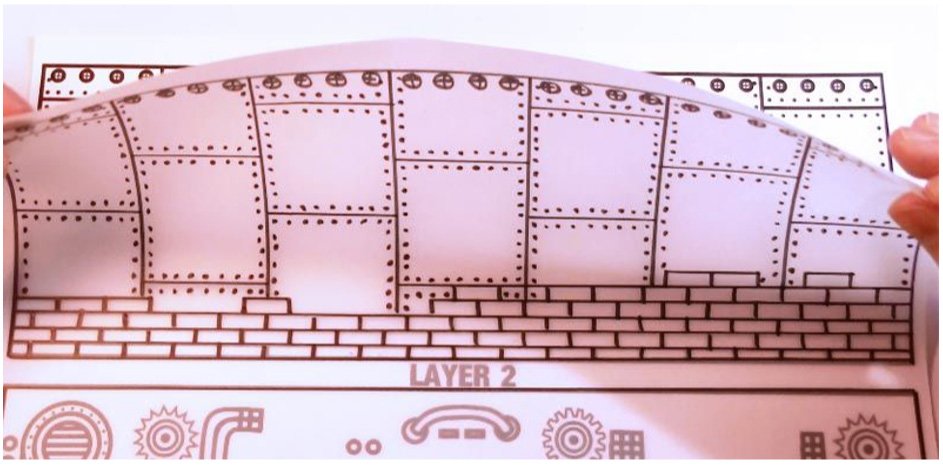
The finished ?translucent layer 1? should look something like this:
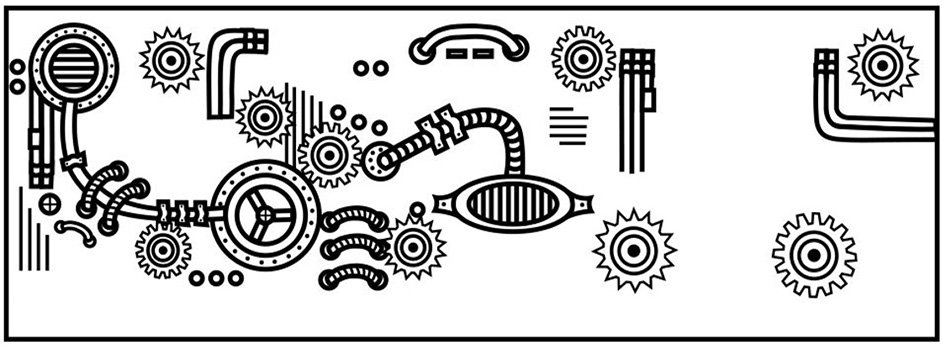
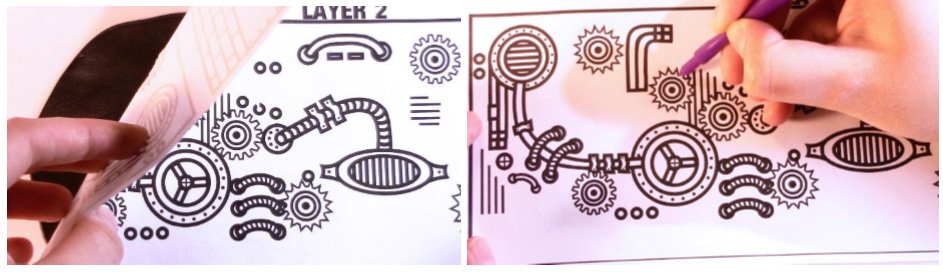
Tracing ?white layer 2? will be slightly more difficult because it has a lot more details and you won?t be able to use your ruler anymore (See left picture below), but make sure you trace every gear, line or circle in its corresponding place (See right picture below).
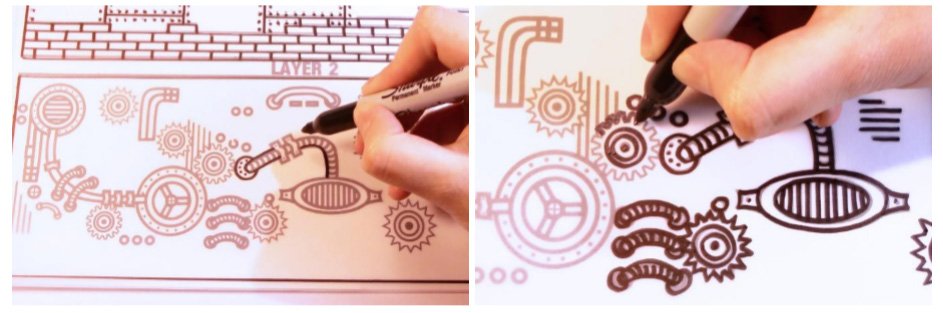
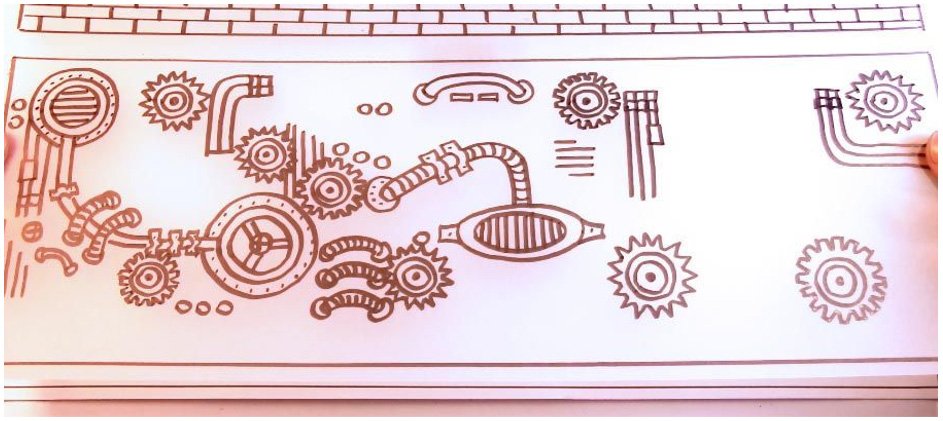
The finished ?translucent layer 2? should look something like this:
Now you need to trace ?white layer 3? onto a separate translucent paper. Place your second piece of translucent paper on top of ?Printable Mug Design Template Layer 3? and trace the entire drawing using your permanent marker. Start by tracing the outside rectangle with your ruler (See left picture below) and then move onto carefully tracing the octopus freehand (See right picture below).
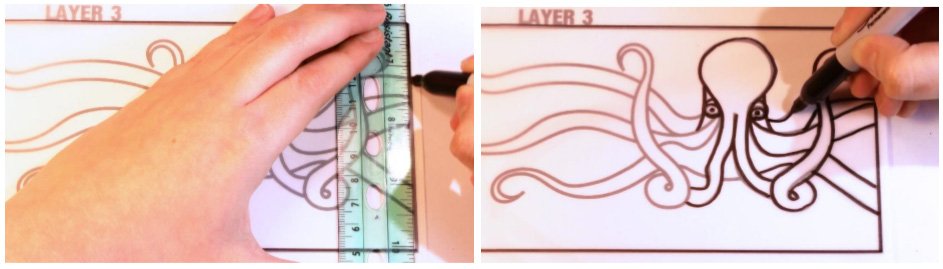
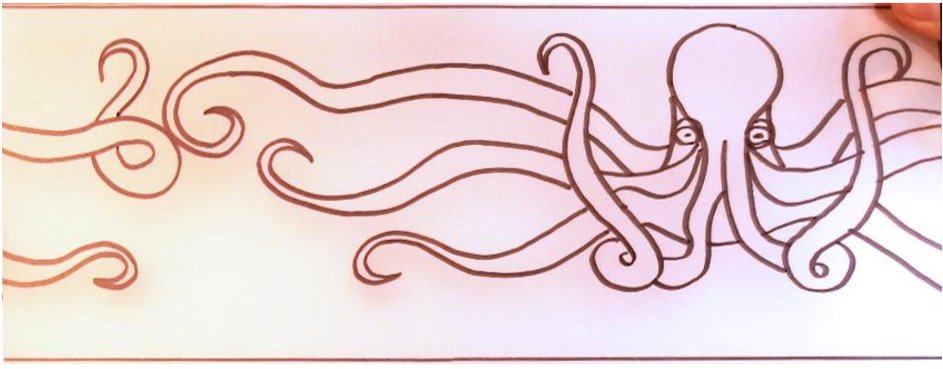
The finished ?translucent layer 3? should look something like this:
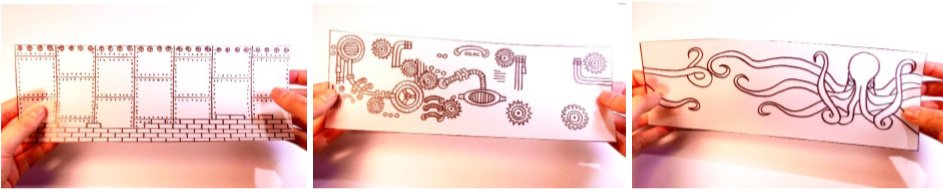
Now you should have three ?white layers? and three ?translucent layers.?
The reason why we didn?t just print the files ?Printable Mug Design Template ?Layer 1 & Layer 2? and ?Printable Mug Design Template ?Layer 3? on the translucent papers is because most printers do not support printing on this type of paper. If yours is like mine, the ink will smear and there will be a lot of paper jam issues.Tracing the design onto the translucent papers is the easiest way for everyone to be able to make the translucent layers regardless of the type of printer they have.
Step 4: Combining the three translucent layers?
For this step, you are going to start by cutting out the translucent layers. Cut them out by following along the outside rectangular shape with your scissors (See picture below).
Your three rectangular translucent layers should look like this:
Now that you have these three separate pieces, you are going to combine them by putting them one behind the other. The translucent papers will let you see through each layer and will create a complete mug design. This is how you should combine them:
First, put ?translucent layer 1? down on your table (See picture below).

Then, place ?translucent layer 2? on top of ?translucent layer 1? (See picture below).

Lastly, place ?translucent layer 3? on top of ?translucent layer 2? (See pictures below).
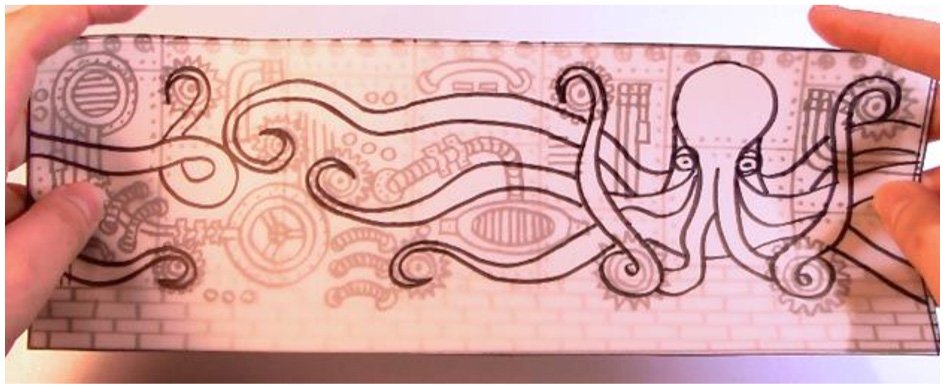
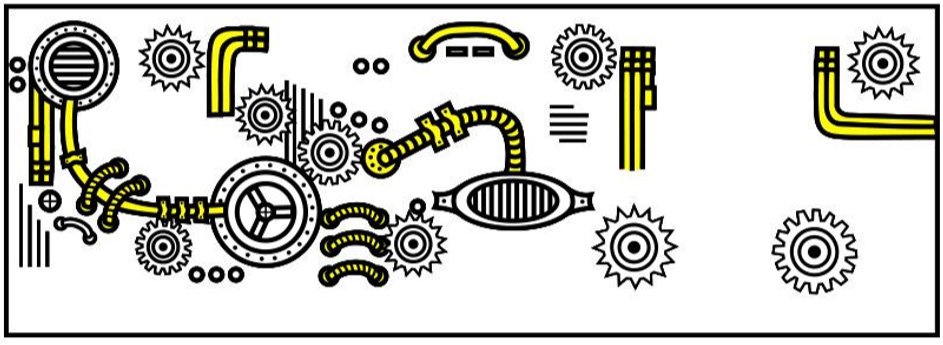
As you can see, you now have a complete mug design (Exactly like the one in the picture below). The best thing about it is that you can separate your design into different layers, which will be extremely helpful in Part 2 of this guide.
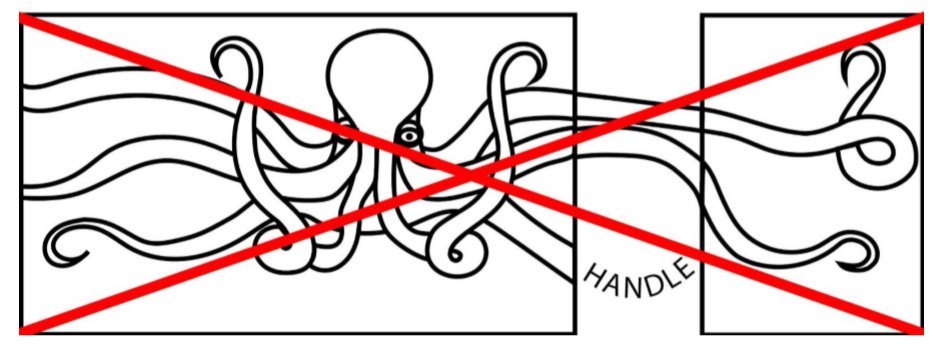
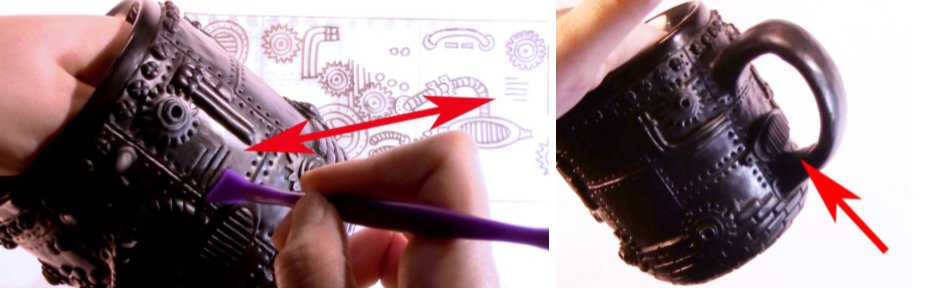
Don?t forget to place the complete translucent mug design on your mug to see what it will look like. (See pictures below).
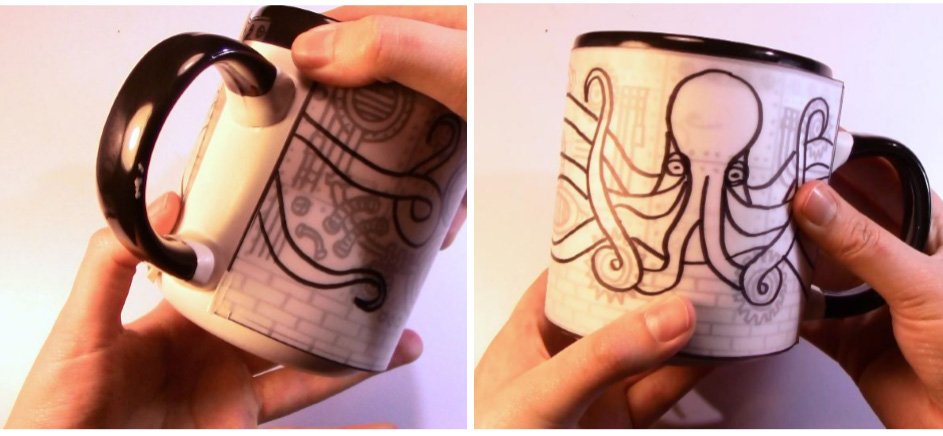
Don?t worry if your mug is bigger than the design and it doesn?t close the gap underneath the handle (See left picture above) because we will be adding polymer clay to those parts later on. This design can work for mugs of any size as long as the handle is on the right of the octopus head (See right picture above).
Step 5: Drawing the plate design ?
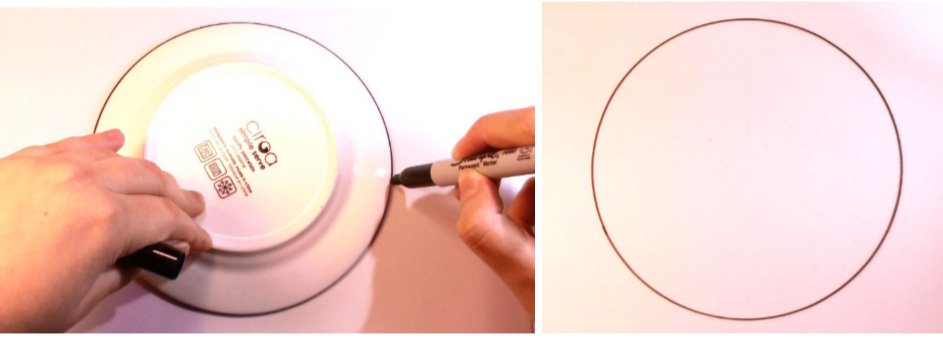
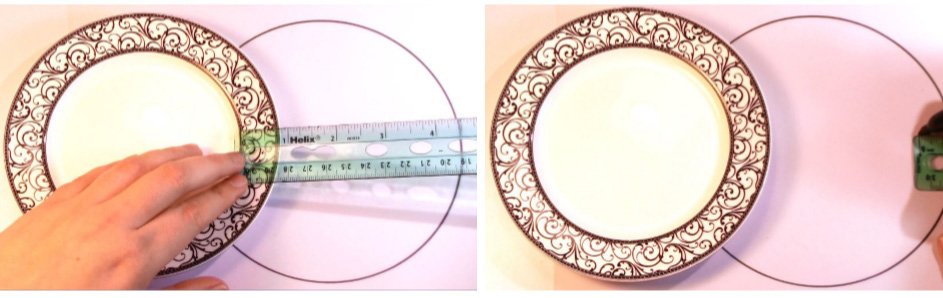
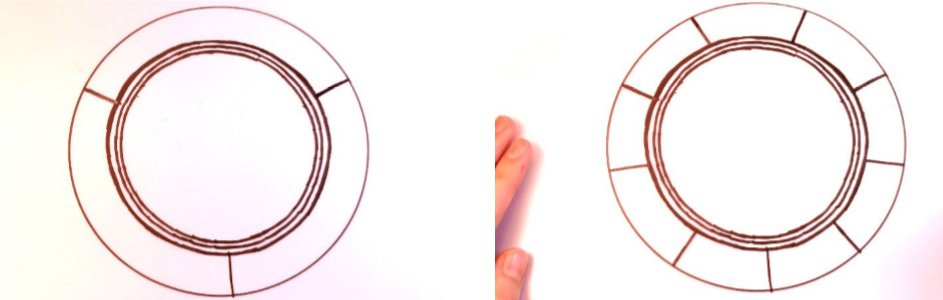
To draw your plate design, you are going to need the last piece of translucent paper, a permanent marker, a ruler and your plate. First, place your plate upside down on your translucent paper and trace its circumference with your permanent marker (See left picture below). You should get a perfect circle like this (See right picture below).
Now, you need to measure the rim of your plate (See left picture below) and put a dot in the corresponding place on your translucent paper to mark where the rim should begin (See right picture below).
Use that same measurement around your circle and you should get something like this (See left picture below). Then, connect those dots to create the border of the rim (See right picture below).
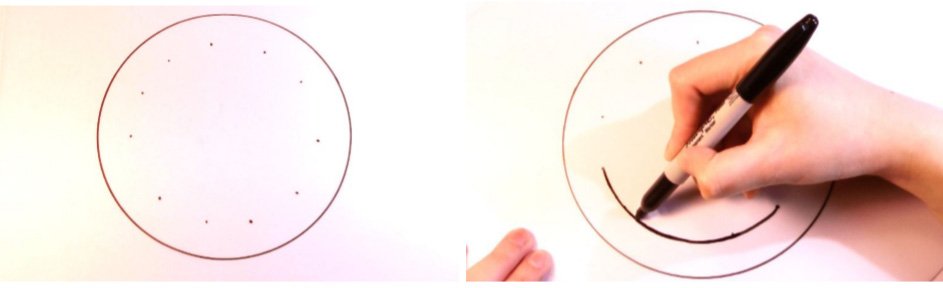
After you?ve created the border of your rim, you?re going to draw two more circles that go along this border. To help you draw these circles, use the same technique you used to make the border, which is to draw paths for your circles with dots (See left picture below) and then connect the dots to complete the circles (See right picture below).
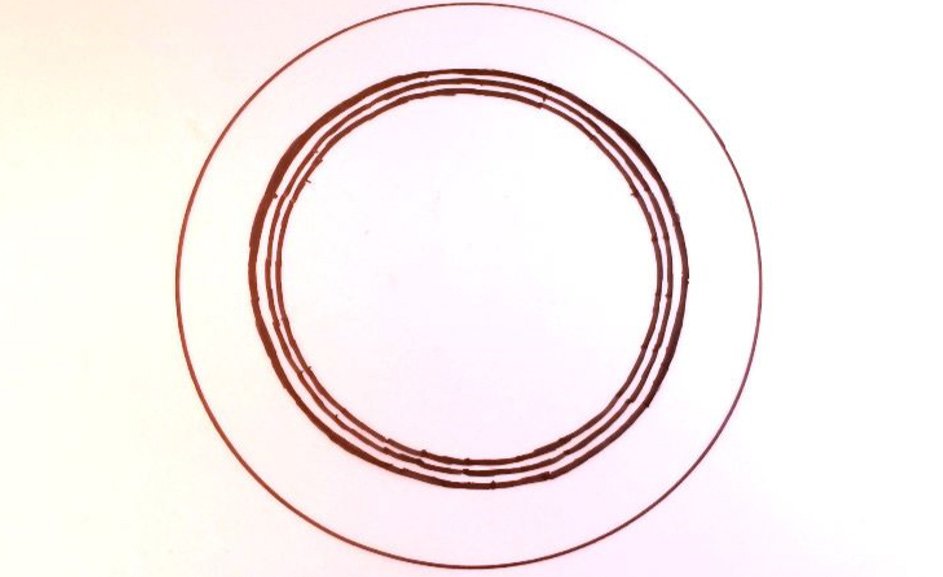
You should now have something like this:
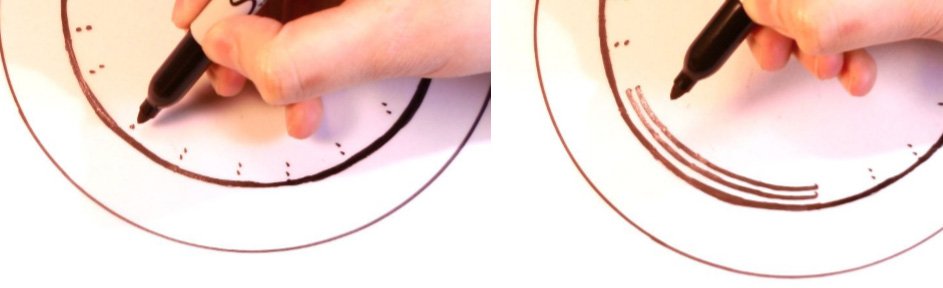
To draw the design on the rim of your plate, you are going to have to divide it into three equal parts (See left picture below) and then divide it into nine equal parts (See right picture below).
Then, draw the same type of design that we used on ?translucent layer 1? (See left picture below) around the rim of your plate (See right picture below).
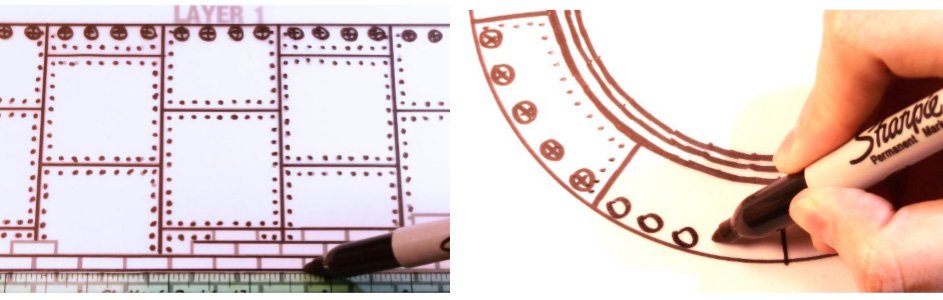
You should get something like this:
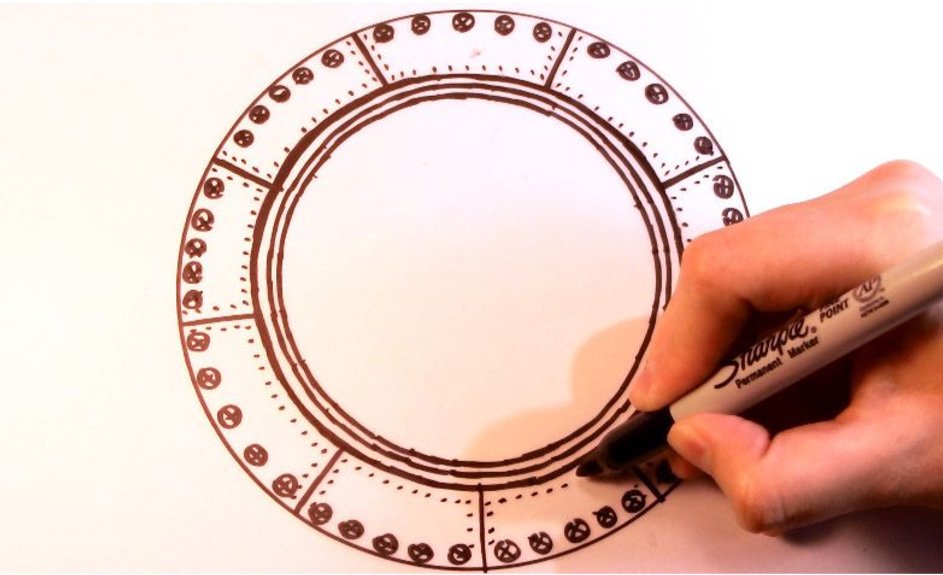
The last details you are going to add to the plate design are nine small ?tube holders? that go around the border of your rim (See left picture below). These tube holders should look the same as the ones you drew on ?translucent layer 2? (See right picture below).
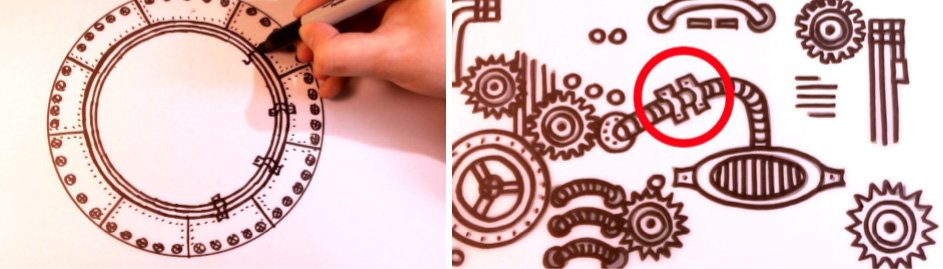
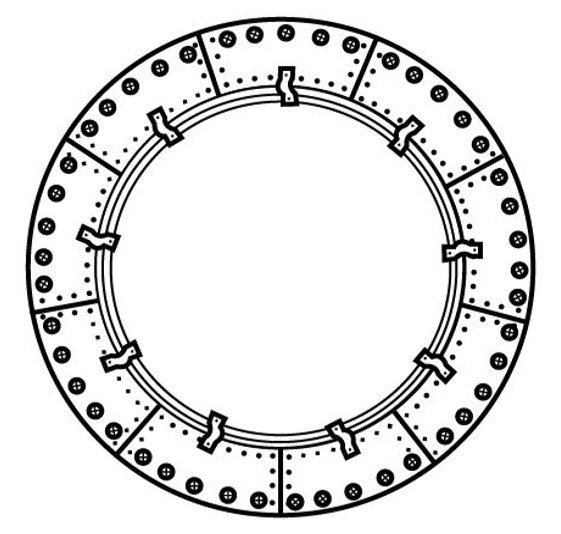
Your final plate design should look something like this (See left picture below), which is exactly the same as this (See right picture below).
The last thing to do is to cut out the circle with your scissors (See left picture below) and place it on your plate to see what it will look like (See right picture below).

And now you are done with Part 1! Take your printed templates, your three ?translucent layers? and your final plate design with you to Part 2, where you will learn how to sculpt these designs onto your mug & plate.
Part 2: Sculpting Your Design
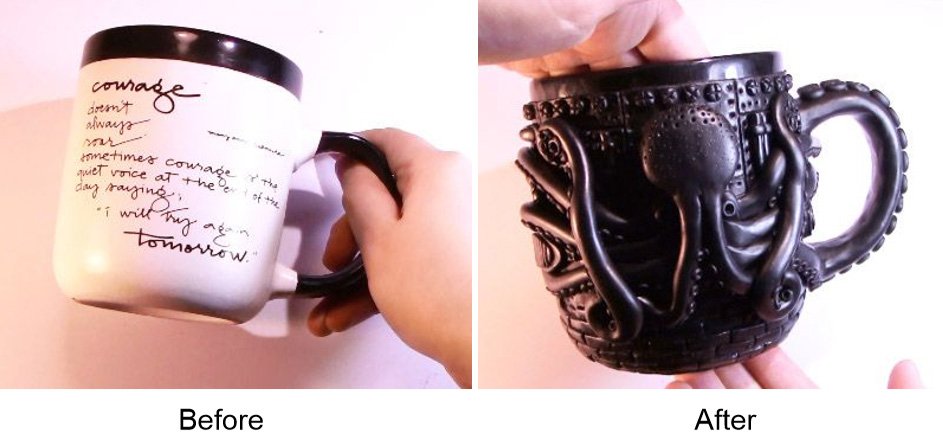
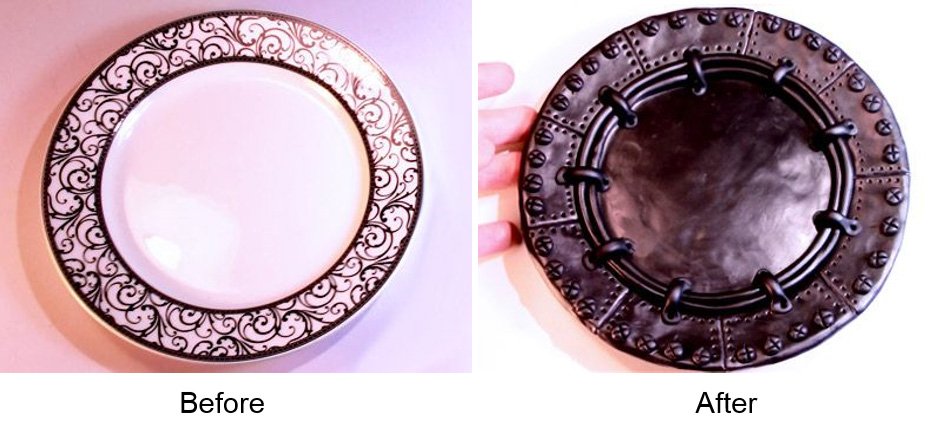
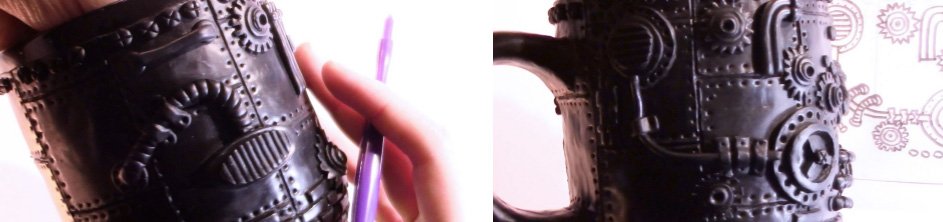
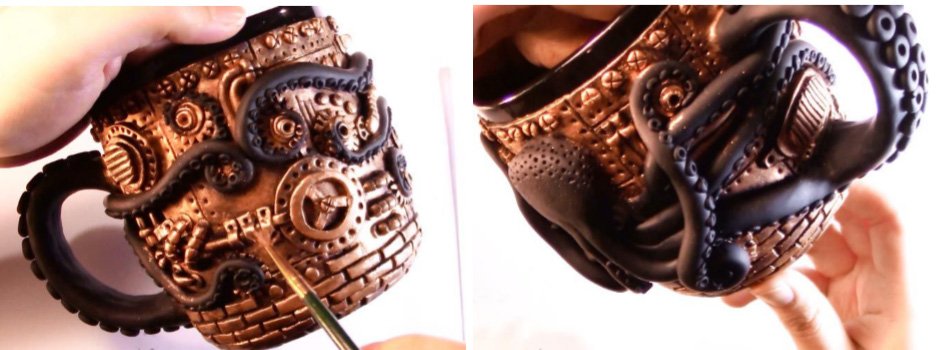
In this part, you will be bringing your mug & plate to life. You will learn how to use polymer clay to turn your boring mug & plate into works of art (See before & after pictures below).
Step 6: Gathering of sculpting materials
The materials you are going to need for all of Part 2 are: ?Printable Mug Design Template ?Layer 1 & Layer 2?, ?Printable Mug Design Template ?Layer 3?, ?translucent layer 1?, ?translucent layer 2?, ?translucent layer 3?, your final plate design, mug & plate, Premo! Sculpey polymer clay, ruler, tape, modeling tools, a roller and an X?Acto knife.
Step 7: Preparing the clay
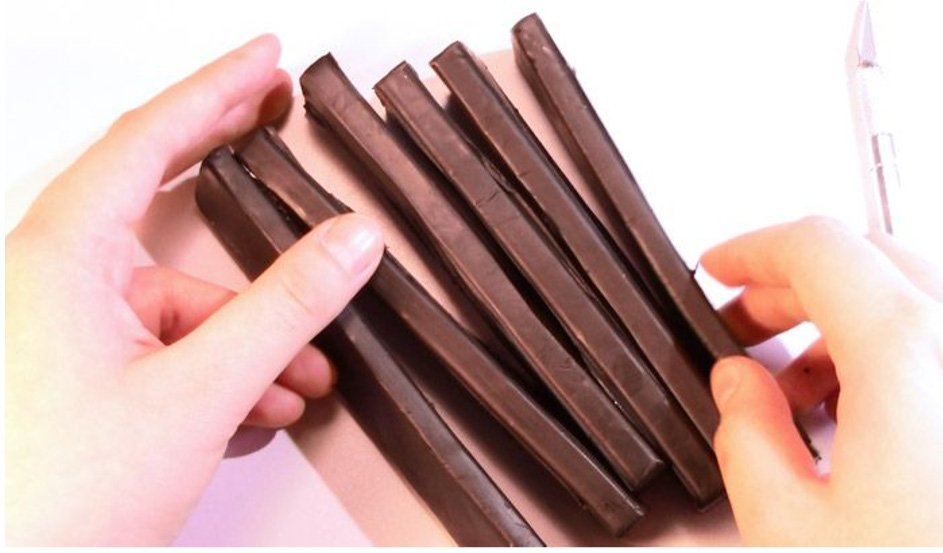
First, you need to open your polymer clay package and prepare the clay. When you open up your polymer clay package, you will find 6 long rectangular bars (See left picture below). You need to use your X?Acto knife to separate the clay into 6 equal parts (See right picture below).

The separated polymer clay bars should look something like this:
I will be referring to these bars throughout Part 2 to measure how much clay you will be needing in each step. Just remember that you may need more clay or less clay in some steps depending on the size of your mug & plate.
Step 8: Start of layer 1
For this step, you will need about 2 bars of polymer clay, your modeling tools, your roller and your ?translucent layer 1?. First, take 1 ? bars of clay (See left picture below) and roll them into a ?ball? (See right picture below). To do this you must pinch, squeeze and roll the clay to make it workable. You can also smooth out any cracks with your thumbs.
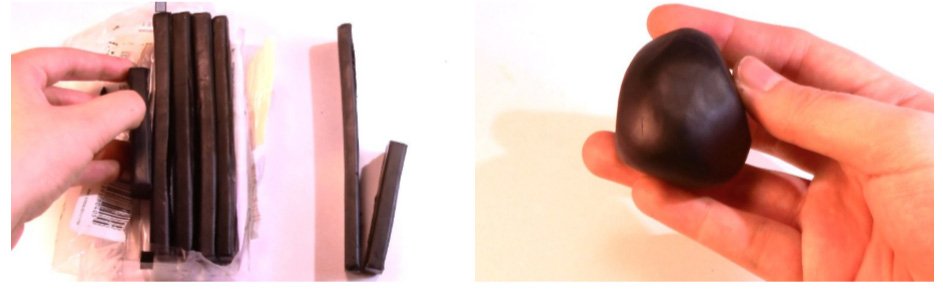
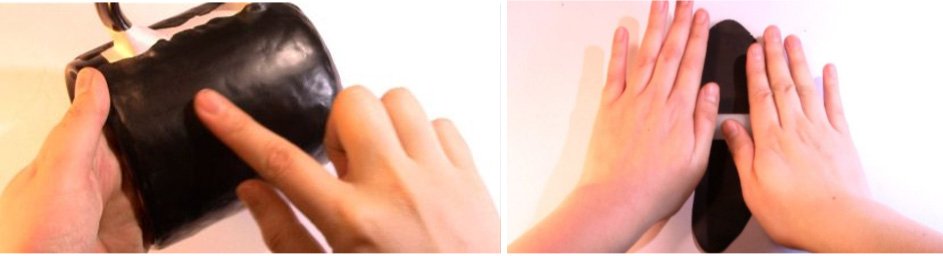
Now, turn the ball you made into a small cylinder by placing your hand on top of the clay and rolling it back and forth on the table. You should get something like this (See left picture below). Then, use your roller to stretch the clay into a long flat shape (See right picture below).
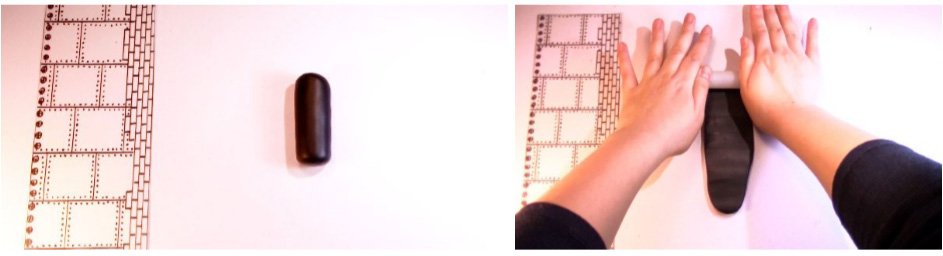
Go up and down with your roller until the clay has reached the length of ?translucent layer 1? (See left picture below). Then, stretch the clay with your roller until it reaches the width of ?translucent layer 1? (See right picture below).
Use one of your flat modeling tools (See left picture below) to cut the excess clay off the sides of ?translucent layer 1? (See right picture below). Make sure you save the excess clay into a pile because you will be using this clay throughout Part 2.

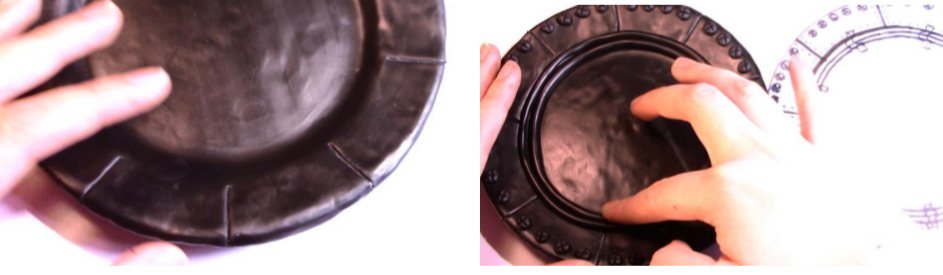
Place the rectangular piece of clay around your mug and leave enough space for a rim. (See picture below). You will not be putting any clay on the rim.
Press on all sides of the rectangle to attach this piece of clay to the mug (See pictures below).
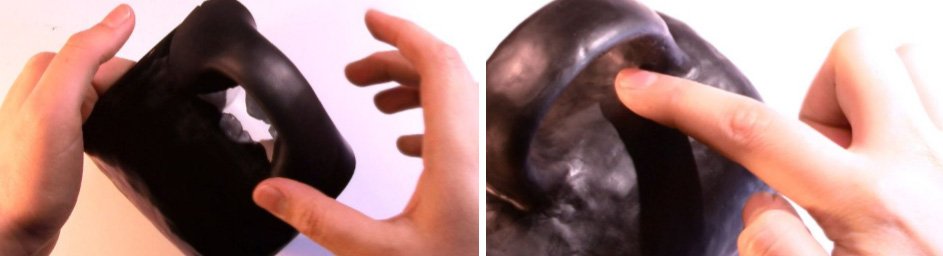
Then, use your fingers to smooth out any air bubbles that could have formed when attaching the rectangle to the mug (See left picture below). Next, make a long flat shape using about ? bar of polymer clay (See right picture below) and use it to cover parts of the mug that aren?t covered with clay (except the inside of the mug, the bottom of the mug and the rim).
Use part of it to cover up the handle and another part to cover underneath the handle (See pictures below). Make sure you smooth out the surface of the mug with your fingers to connect all the different pieces of clay together. (See right picture below).
Step 9: Creating the background
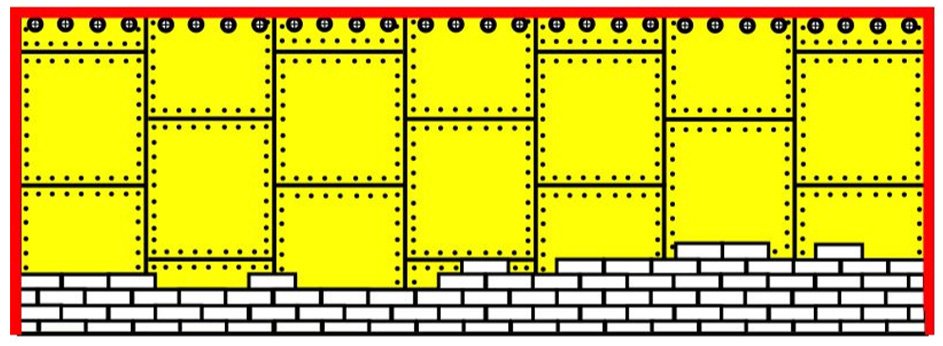
Now that you have to your mug covered with polymer clay, it is time to start drawing on the background (The background is the highlighted part of the picture below).
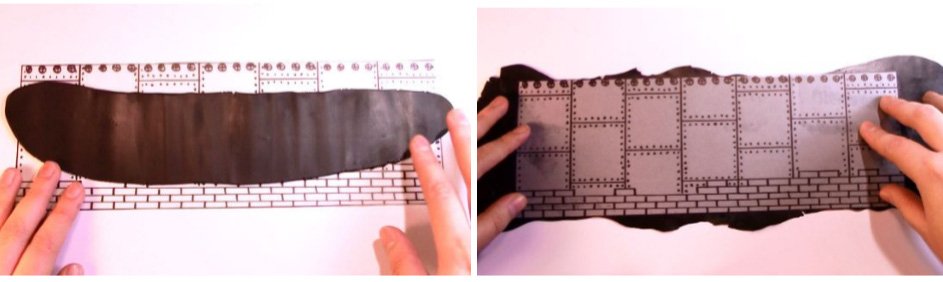
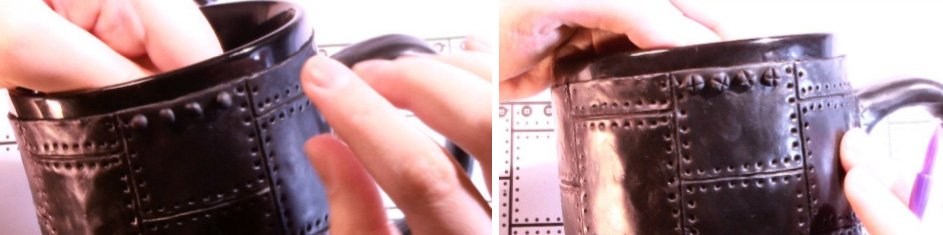
Attach your ?translucent layer 1? with tape on the surface of your mug (See left picture below). Then, use one of your pointed modeling tools to trace the background onto the clay (See right picture below). First, use your tool with enough pressure to mark all the lines of the background on the clay. Then, puncture through the translucent layer to mark all the dots of the design.
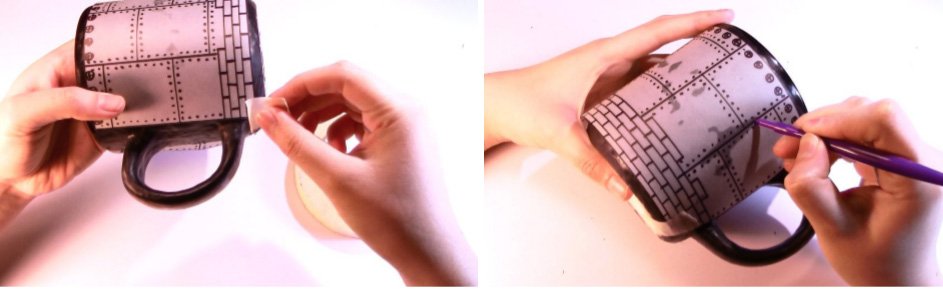
Mark the borders marked in red with your flat modeling tool (See picture below).
Peel off ?translucent layer 1? off the surface of your mug to see the design on your clay. The results of tracing the background onto the clay should look something like this:
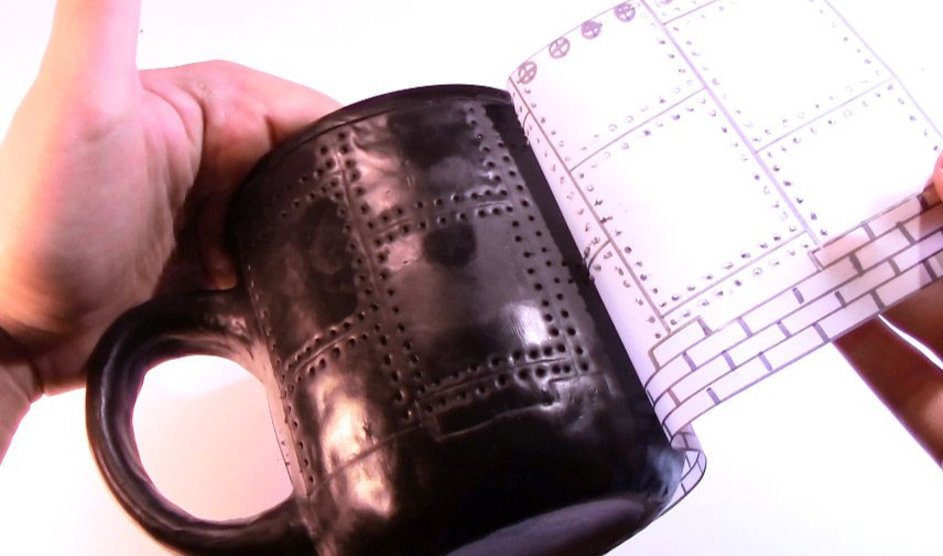
Next, use your flat modeling tool to clean the rim of your mug (See left picture below). Use the top border you made (See right picture below) to help you determine where the rim should be.
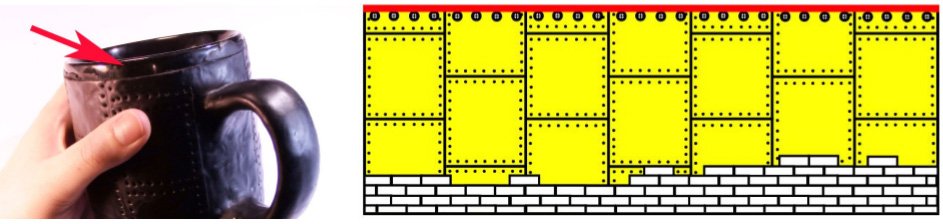
Also, clean off the bottom of your mug with your flat modeling tool (See left picture below). Put all the clay that you remove from the rim and the bottom of your mug into the excess clay pile. Then, use your pointed modeling tool to define the lines of the background more clearly because some lines might not have been traced with enough pressure (See right picture above).
The last thing to do on this step is to continue the pattern of the background on the parts of the mug that weren?t covered by ?translucent layer 1?. The continuation of the pattern underneath the handle should look something like this:
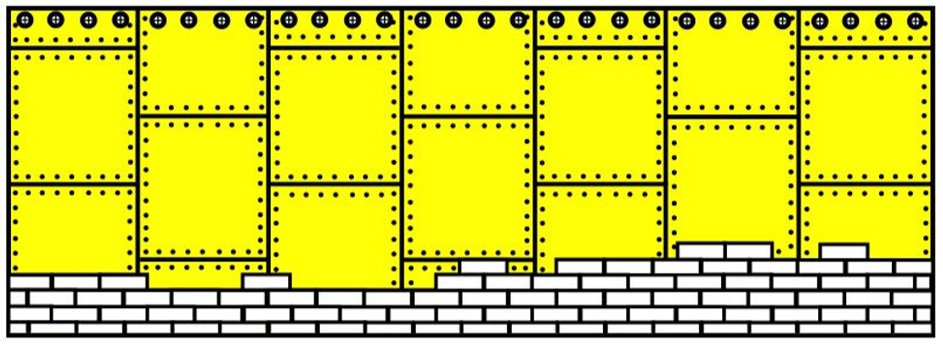
Step 10: End of Layer 1
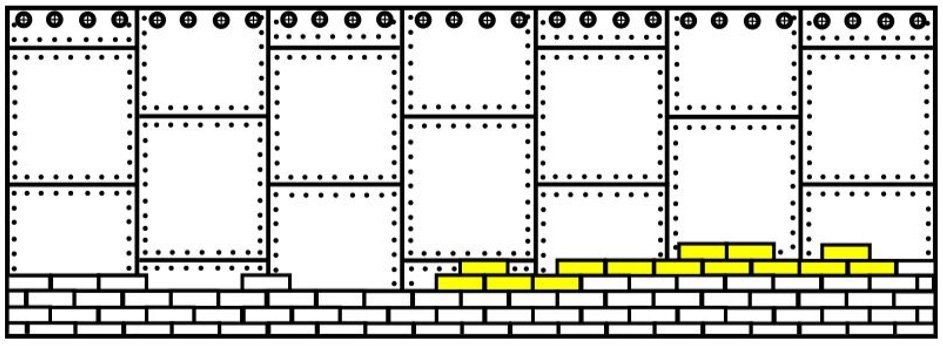
In this step, you will be creating the rivets and bricks of the design (See picture below).
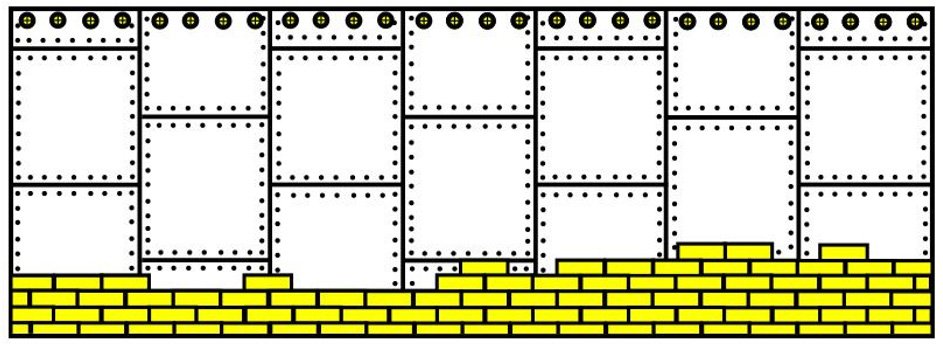
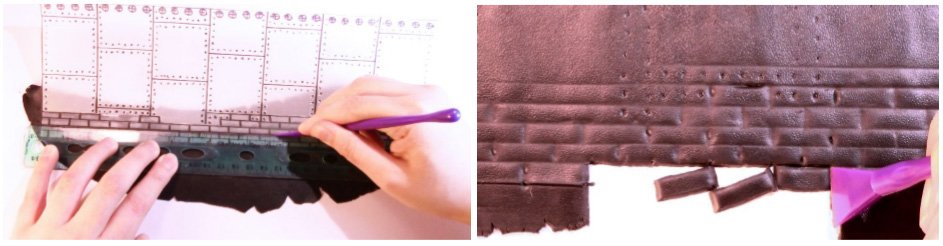
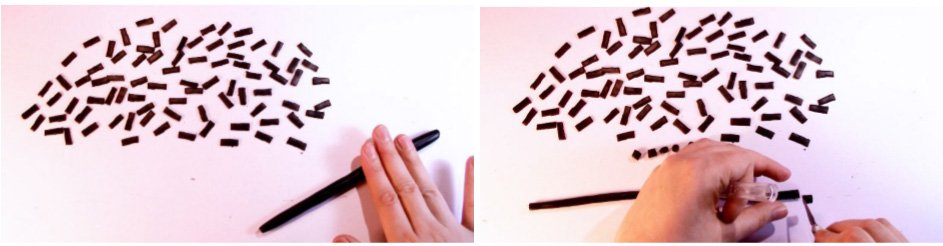
Make long flat shape with ? bar of polymer clay and trace the bricks onto it with your flat modeling tool and ruler (See left picture below). You might need to create more bricks than the design has depending on the size of your mug. If you do need more, just use another flat shape of clay and trace more bricks. Then, carefully remove each brick and put them aside (See right picture below).
Use the excess clay from the flat shape that you made to create a long snake?like tube (See left picture below). Once your tube is around the width of a rivet in the design, cut off little pieces from it with your X?Acto knife and put them aside (See right picture below).
Next, you need to attach the bricks to your mug. Use your ?white layer 1? to help you determine exactly where the bricks go and use your modeling tools to help you attach them to the mug. Start by placing the following bricks (See picture below) in their corresponding places.
Then, use your flat tool and pointed tool to attach the sides of each brick to the mug (See left picture below). Continue attaching the bricks around your mug and stop when you reach the bottom of your mug (See right picture below).
Now you need to create the rivets and attach them to your mug. Grab the little pieces that you cut from the snake?like tube and turn them into little balls. These balls should be the same size as the rivets on ?translucent layer 1? (See left picture below). If your tube pieces are too big, cut them in half with your X?Acto knife before turning them into balls. (See right picture below).
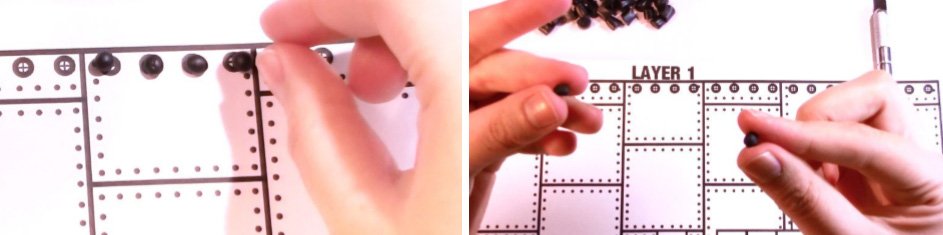
Place the little balls on their corresponding places (See left picture below) and then draw an ?X? on each ball with your flat modeling tool. Your rivets should look like this (See right picture below).
This is what your mug should look like when you are done with Layer 1:
Step 11: Start of Layer 2
For this step, you will need the pile of excess clay you?ve been collecting or about ? bar of polymer clay, ?white layer 2?, ?translucent layer 2?, your modeling tools, roller and an X?Acto knife. You will be creating the gears of the design (See picture below).
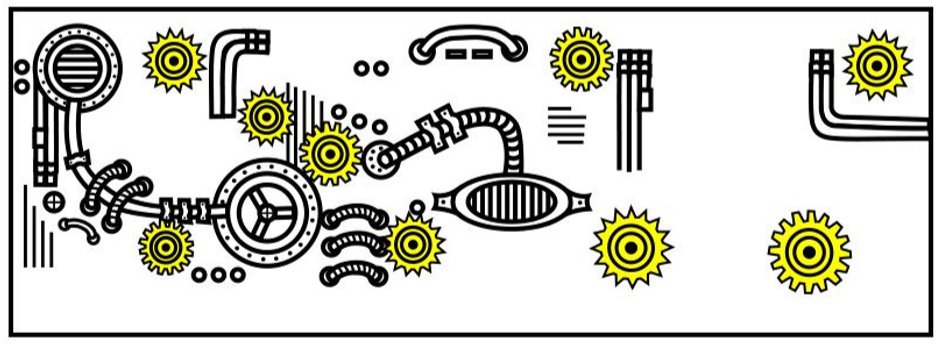
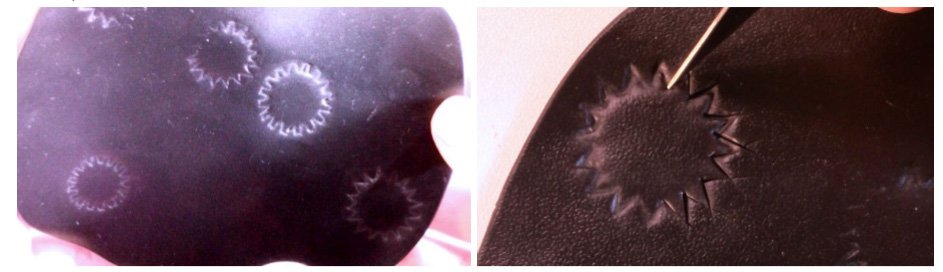
The first step is to create a flat shape with the pile of excess clay and place ?white layer 2? on top of it (See left picture below). You are going to use ?white layer 2? instead of using ?translucent layer 2? because the designs on ?white layer 2? are much more precise. Slowly trace the outside spikes of each gear with your pointed modeling tool onto the clay (See right picture below).
When you remove ?white layer 2? from the clay, you should get something like this (See left picture below). Now, use your X?Acto knife to carefully cut the gears out (See right picture below).
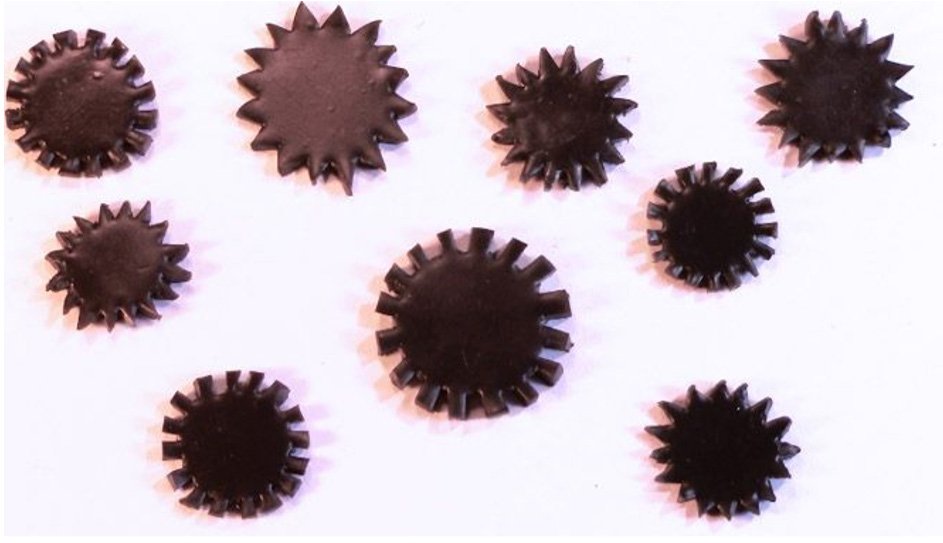
Your gears should look something like this:
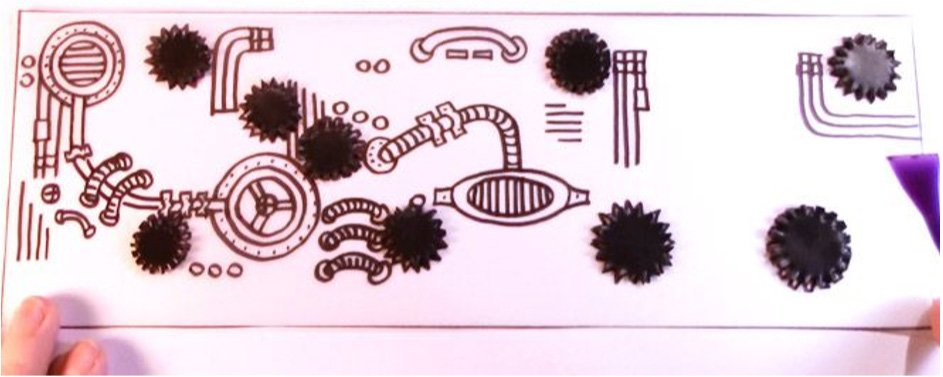
Keep your gears organized by putting them where they belong on ?translucent layer 2? (See picture below).
Next, take the excess clay that was left from making the gears and make another flat shape. Place ?white layer 2? on top of the flat shape and trace the circles inside the gears (See left picture below). First, trace the inner circle inside of the gear and lift up ?white layer 2? from the clay. Then, put ?white layer 2? in a different spot on the clay and trace the outer circle of the gear. You should get something like this for each gear (See right picture below).

Cut the small circles out with your X?Acto knife and place them on top of each other and on top of the corresponding gear. Top off the gear with a rivet-size clay ball (See left picture below) and use your pointed modeling tool to push and merge everything together (See right picture below).
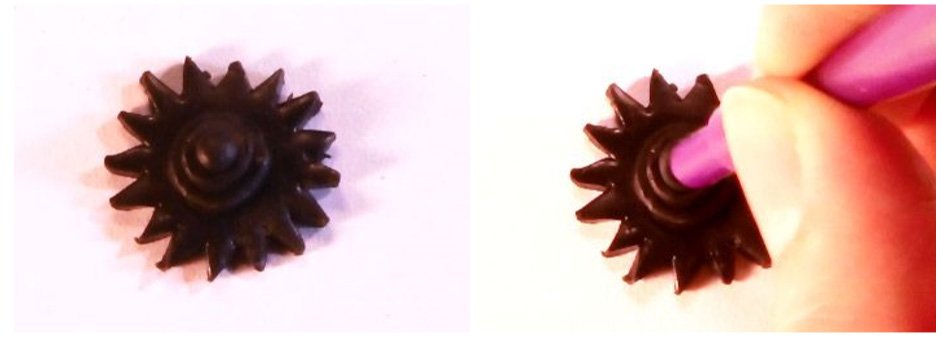
Your finished gears should look something like this:
Step 12: Creating the embellishments
In this step, you will be creating the rest of the embellishments (See picture below) with the same technique you used in Step 11.
Start with this embellishment:

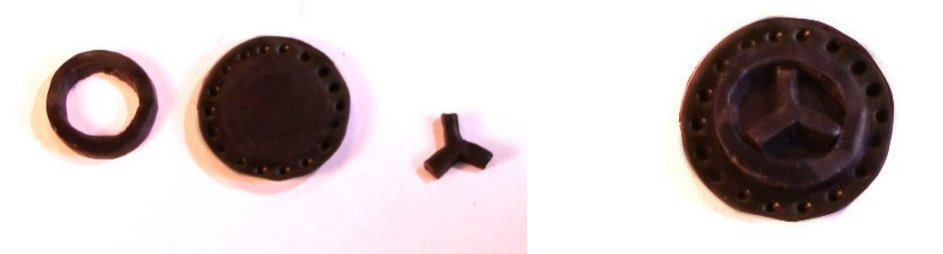
Make a flat shape out of ? bar of polymer clay or by using the excess clay pile from the last step and place ?white layer 2? on top of it. Trace the first circle with lines (See picture above) and lift up ?white layer 2? from the clay. Then, put ?white layer 2? in a different spot on the clay and trace the second circle (See picture above). Lift up and move ?white layer 2? to another spot on the clay and trace the third circle (See picture above). Now, cut all three shapes out with your X?Acto knife and place them on top of each other from biggest to smallest. Merge the layers together by pressing on the lines of the smallest circle with your flat modeling tool. You should get something like this:
Next, you need to make this embellishment:

Use the same technique as before and cut these shapes out with your X?Acto knife. You should get something like this (See left picture below). When you stack all the different layers together, you should get something like this (See right picture below).
Then, top off the embellishment with a rivet-size ball. To merge everything together, use your flat modeling tool to draw an ?X? on the rivet-size ball. You should get something like this:
Repeat the same previous technique for the following embellishment:

Use your flat modeling tool to connect all layers of the embellishment and you should get something like this:
Make two of this embellishment and put the second one aside because you will be using the second one underneath the handle of your mug.
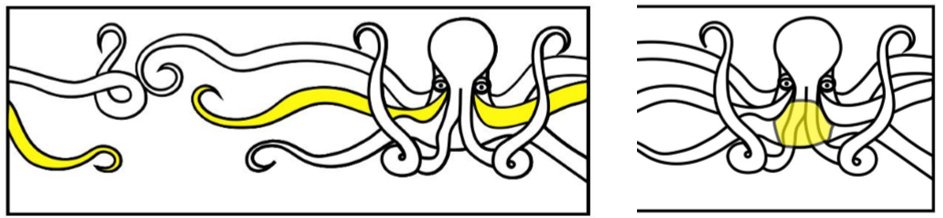
Now, you will be creating the following highlighted embellishments (See picture below).
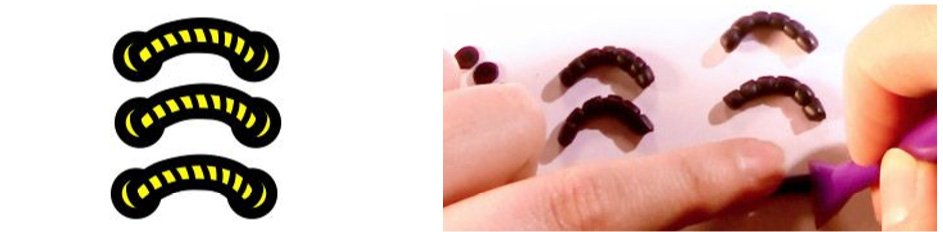
First, create a thin snake?like tube (See left picture below) out of the excess clay pile. Then, align the tube to an embellishment on ?white layer 2? and start cutting the tube in pieces that match the length of the embellishment on the design (See right picture below).
You should get something like this (See left picture below). Then, grab a very small piece of clay and wrap it around the end of the tube pieces (See right picture below). You should connect all of these different pieces together with your flat modeling tool.
Use the same technique on all tube?like embellishments (See picture below).
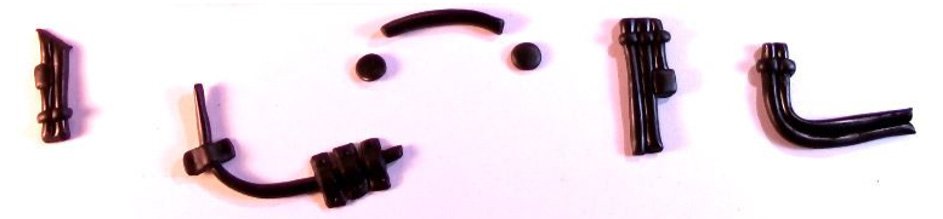
The only tube?like embellishment that is slightly different is this one (See pictures below). To create the little ?tube holders? (See left picture below), you need to cut small rectangles and place them on their corresponding places on the tube. Then, push the sides of the rectangles down with your fingers and use your pointed modeling tool to create the small holes.

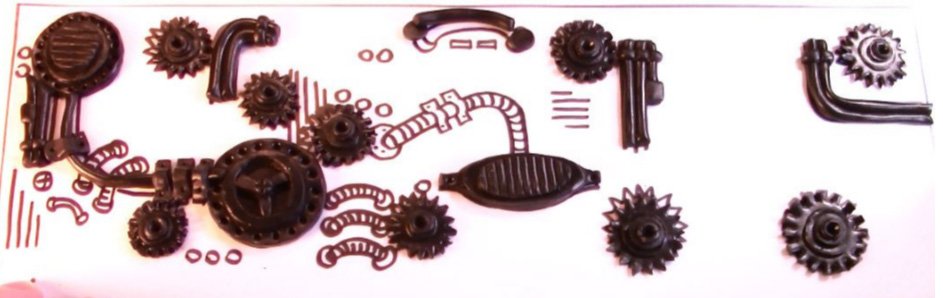
These are the embellishments you should have made so far:
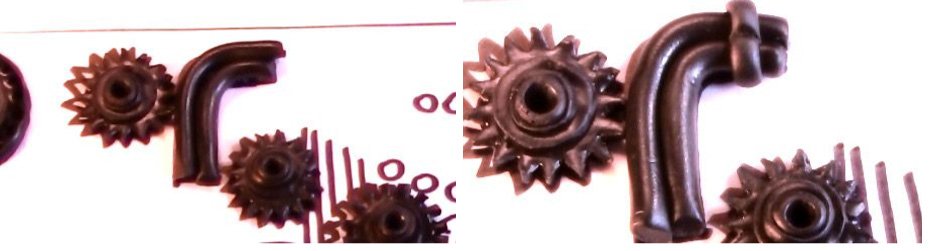
To make the following embellishment (See left picture below), you need to start with a thicker tube and sculpt the details with your flat modeling tool (See right picture below).

Do the same details on these embellishments using thinner clay tubes (See pictures below).
The last thing to do on this step is to create all the small details highlighted (See picture below).
Now, remove all embellishments from ?transparent layer 2? and organize them on your table.
Step 13: End of Layer 2
For this step you will need all the embellishments you created in Step 11 & Step 12, modeling tools, tape, ?translucent layer 1?, ?translucent layer 2? and ?white layer 2?. First, use tape to attach ?translucent layer 2? on top of ?translucent layer 1? and use this as a guide to show you where to place all the embellishments (See left picture below). Then, slowly attach the embellishments on their corresponding places. After you have placed an embellishment in the correct place, connect the sides of the embellishment to the mug with your flat modeling tool (See right picture below). This will prevent the embellishment from falling off.

These are the results you should get:
Once you?ve attached all the embellishments on the design, you need to add the last touches of layer 2. For example, you need to add the various lines on the design with your flat modeling tool (See left picture below) and you also need to attach the extra embellishment that you made for underneath the handle of your mug (See right picture below).
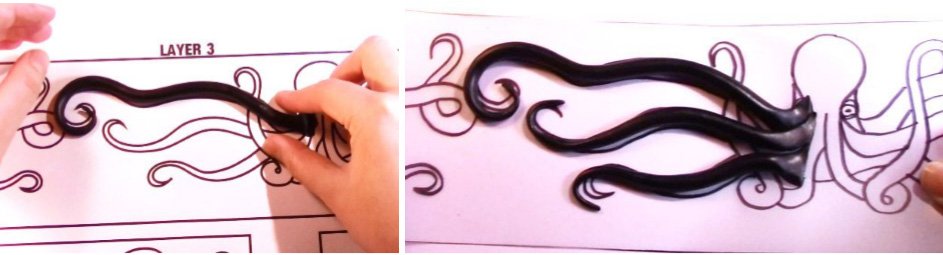
Step 14: Start of Layer 3
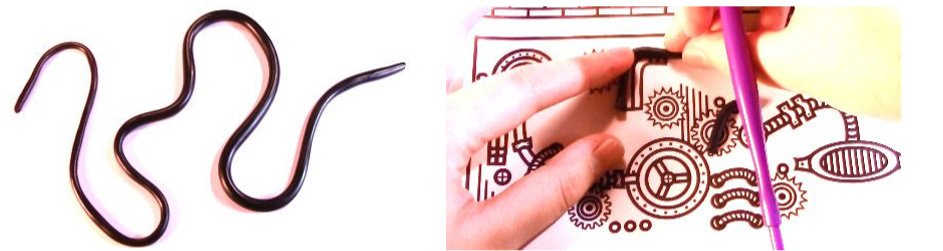
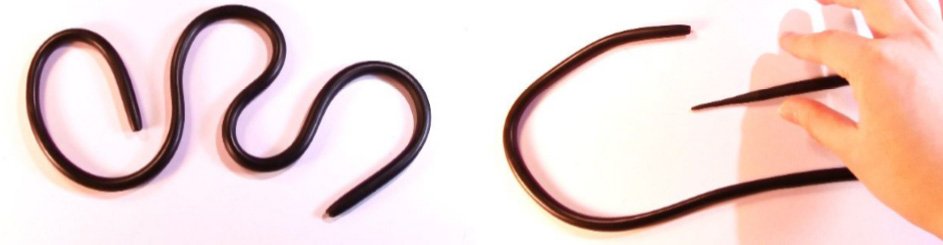
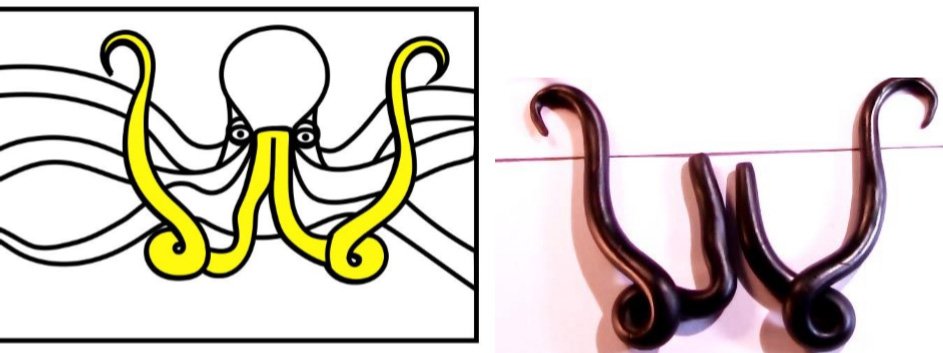
Now it is time to work on the last layer of your mug design. You are going to need your ?white layer 3?, ?translucent layer 3?, modeling tools, roller, X?Acto knife and about 1 ? bars of polymer clay (You can also use any clay you have left from your excess clay pile). First, make a long thick tube with 1 bar of polymer clay (See left picture below). This tube will be used for all the tentacles on the octopus. Use ?white layer 3? to determine how thick your tube should be. Make one end of the tube thinner than the rest (See right picture below).
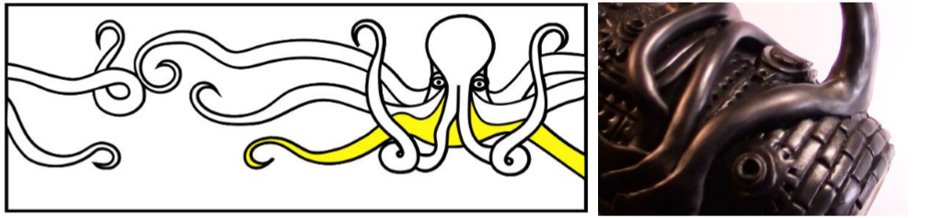
Use the part with the thinner end to match the highlighted tentacle (See picture below).
To make this tentacle, you need to place the clay tube on ?white layer 3? in the corresponding place and cut it off where the tentacle ends (See left picture below). Create the other two left tentacles the same way you created the first one (See right picture below).
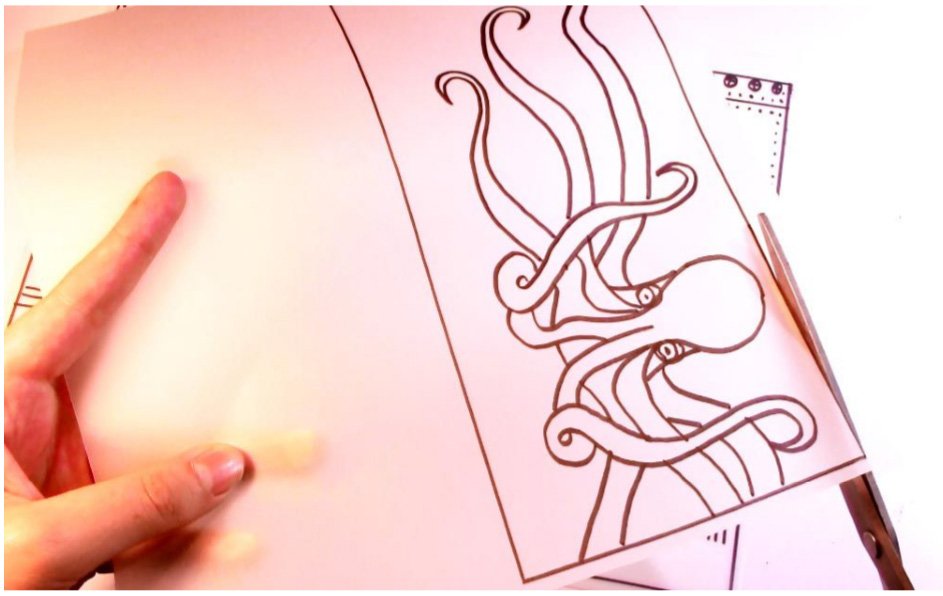
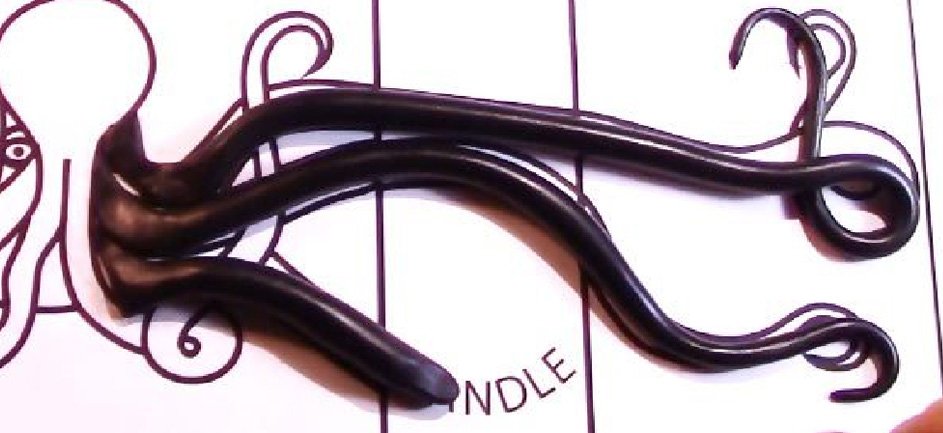
To make the tentacles on the right, you need to use the following printed picture:
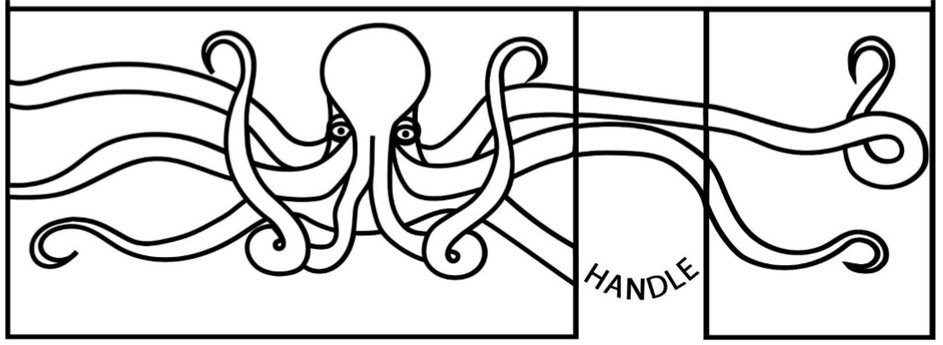
You need to use this image because the right tentacles in ?white layer 3? get cut off. Your right tentacles should looks something like this:
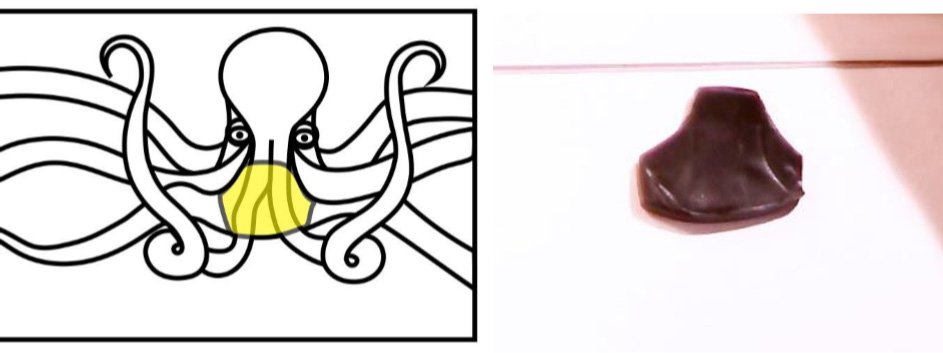
Now, you need to create part of the head of the octopus. Use the excess clay pile or about ? bar of polymer clay to create a flat shape. Then, place ?white layer 3? on top of the clay and trace the highlighted shape onto it (See left picture below). Cut out the shape with your X?Acto knife and you should get something like this (See right picture below).

Now, follow the same steps as above to trace this piece (See left picture below). You should get something like this (See right picture below).
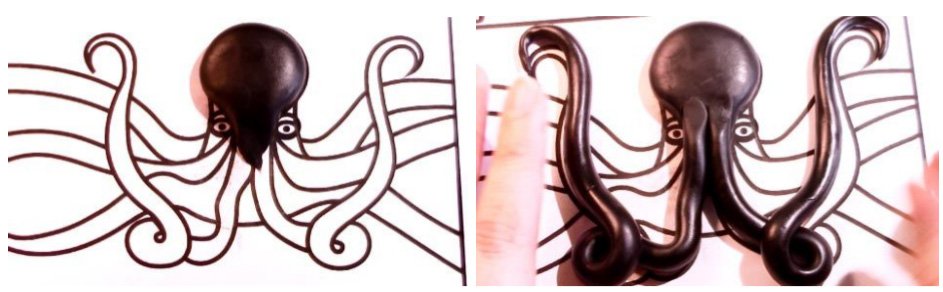
Next, you need to create the front tentacles (See left picture below) using the long ?thick tube. The front tentacles should look like this (See right picture below).
Now, create an oval shape out of a ? bar of polymer clay (See left picture below) and attach it to the two front tentacles. The head of the octopus should look like this (See right picture below).
Step 15: The octopus
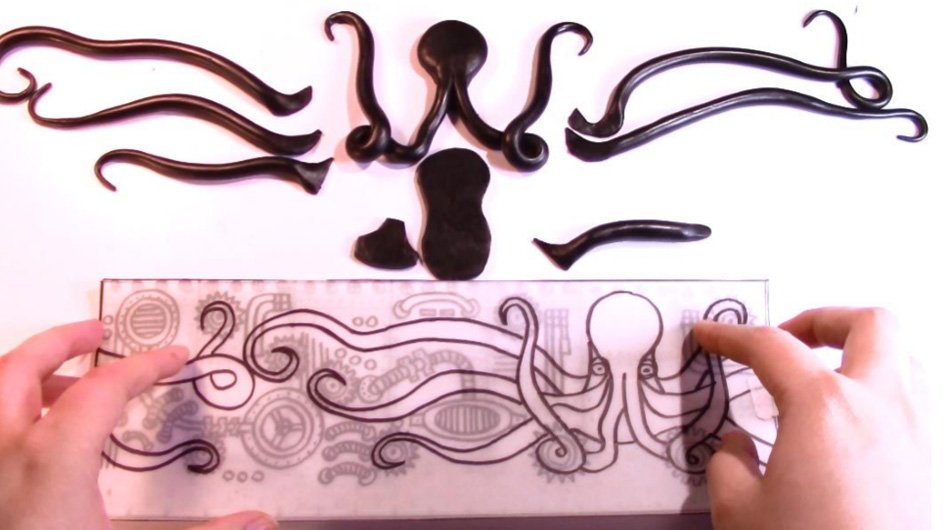
Start by taping ?translucent layer 1?, ?translucent layer 2? and ?translucent layer 3? one behind the other and use this as a guide to help you determine where each piece of the octopus is supposed to go (See picture below).
Slowly attach each part of the octopus with your fingers and modeling tools. The first pieces of the octopus that should be attached are the two top tentacles (See left picture below). Then, you should attach this piece of the octopus (See right picture below).
Next, attach these tentacles on your mug (See left picture below), followed by this piece of the octopus (See right picture below).
Then, attach these tentacles (See left picture below). The right tentacle below is very important because it will attach to the handle of your mug. Grab a small piece from the excess clay pile and create a bridge that connects the tentacle to the handle. Smooth out the bridge with your fingers until the tentacle and the handle become one piece (See right picture below).
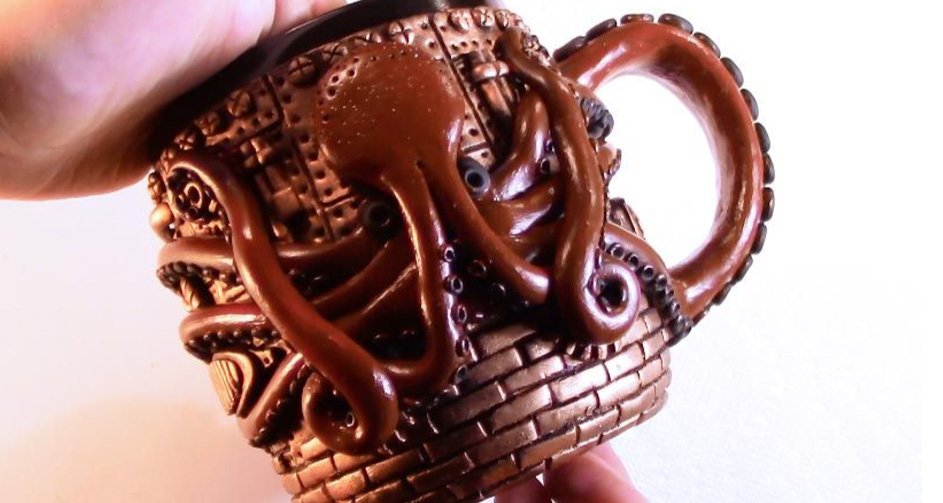
Then, attach the last pieces of the octopus, which are the head and the two front tentacles. This is what your mug should look like:
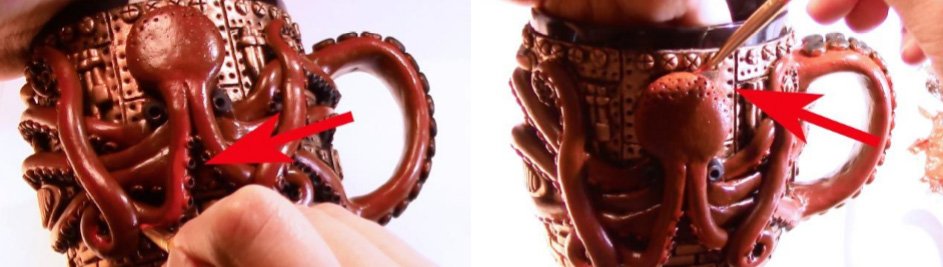
Next, create two small clay balls and two slightly bigger flat clay circles (See left picture below). Put one behind the other and attach them onto the eyes of the octopus with your pointed modeling tool (See right picture below).
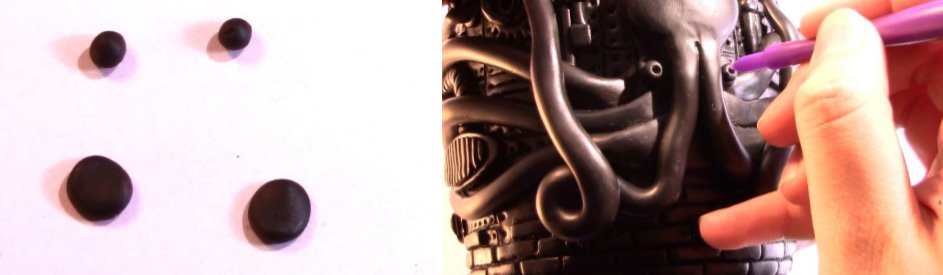
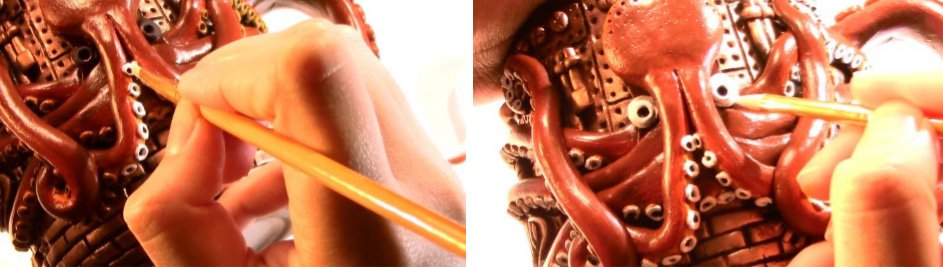
Now, use small clay balls to create the suckers on the tentacles. Pick up the small clay balls with your pointed modeling tool and push them into place (See left picture below). Your finished tentacles should look something like this (See right picture below).
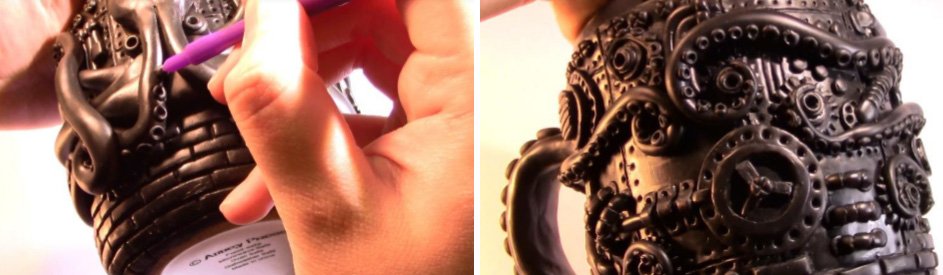
Use a variety of sizes for the suckers depending on which part of the tentacle you are working on. If you are working on a thinner part of the tentacle, use very small clay balls to create the suckers. If you are working on the thicker parts of the tentacles, like the handle of your mug, you will need to use much bigger clay balls to create the suckers (See left picture below).
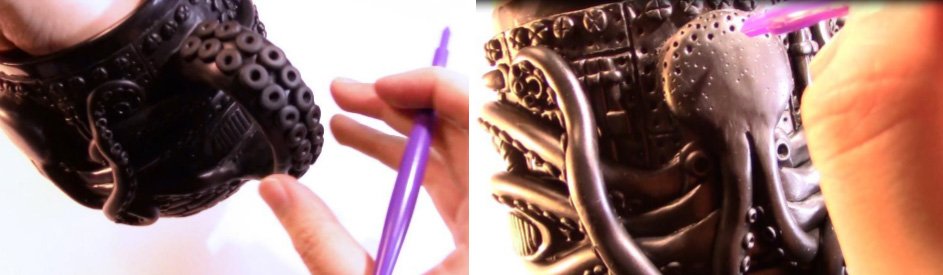
The last thing to do on this step is to use your pointed modeling tool on top of the octopus? head to give it some texture (See right picture above).
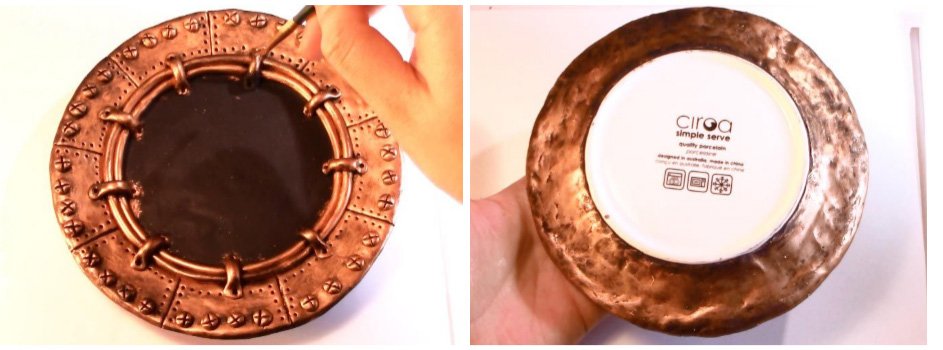
Step 16: Sculpting the plate
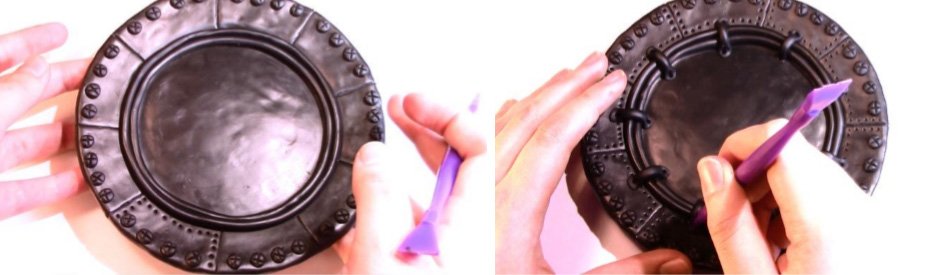
For this part you will need your plate, modeling tools, roller, 1 bar of polymer clay and your final plate design. Sculpting the plate will be easier because you will be using the same techniques you used for the mug. First, cover the entire plate with about 1 bar of polymer clay (See left picture below). Then, place your ?final plate design? on your plate and trace the 9 lines of the rim design with your pointed modeling tool (See right picture below)
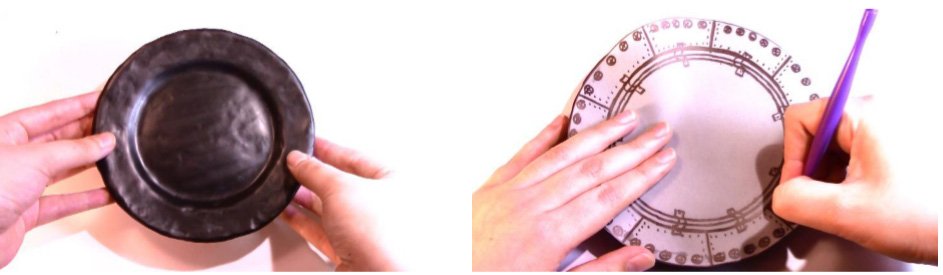
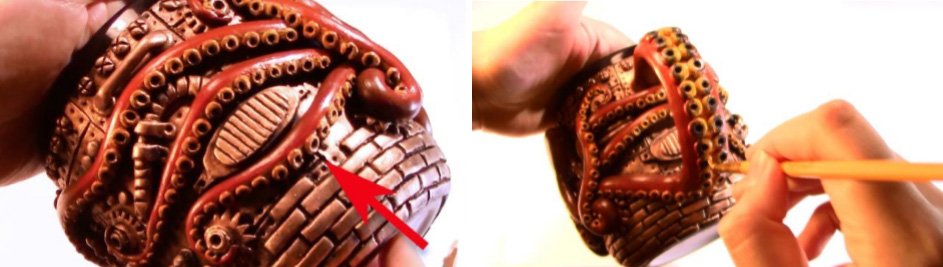
Define the lines you made with your flat modeling tool (See left picture below) and start creating the embellishments with the excess clay. Create the rivets for the rim and two snake-?like tubes for the border of the rim (See right picture below) by using your ?final plate design? as a guide.
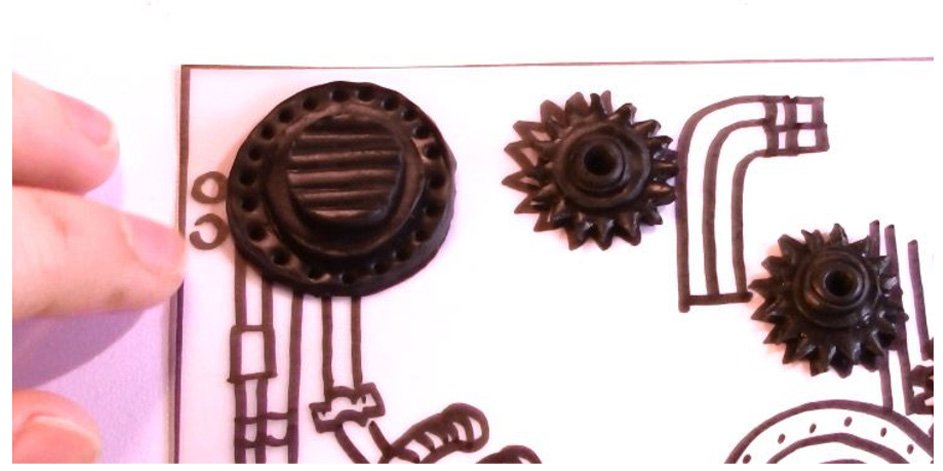
The last two things you need to do for this step are to create the ?tube holders? and the dots around the rim with your pointed modeling tool (See pictures below).
And now you are done with Part 2! Pat yourself in the back because you have now completed the hardest part of this guide. Go on to Step 3 to learn how to bake the mug & plate!
Part 3: Baking Your Mug & Plate
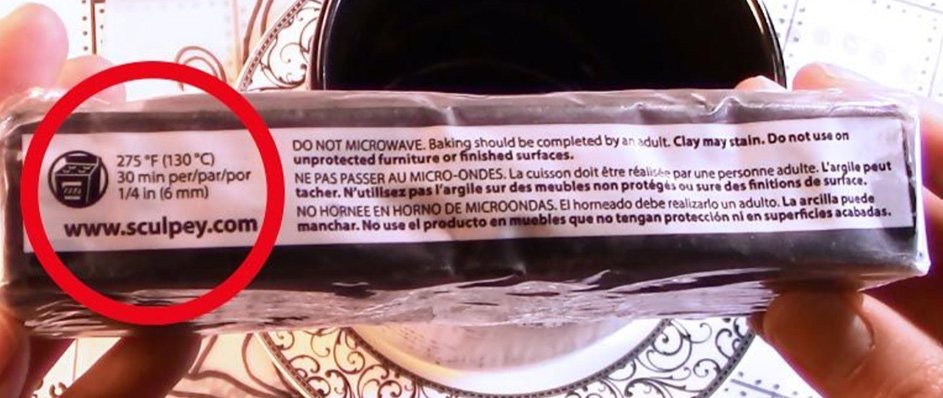
In this part, you will be curing your polymer clay mug & plate. It is essential to bake polymer clay to cure it. You will need to bake your mug & plate in an oven, not in a microwave. The most important thing is to have an accurate temperature in your oven. Look on the package of your polymer clay for the recommended baking temperature and stick to it closely (See picture below).
Step 17: Gathering of baking materials
The materials you will need are: your finished mug & plate, a metal or glass baking pan, a sheet of aluminum foil, an oven, an oven thermometer and an oven timer.
Step 18: Baking your pieces
The first thing you need to do in this step is to look on the package of your polymer clay for the recommended baking temperature and the recommended baking time. If you are using Premo! Sculpey polymer clay, the recommended baking temperature is 275? ?F and the recommended baking time is 30 minutes (See picture above).
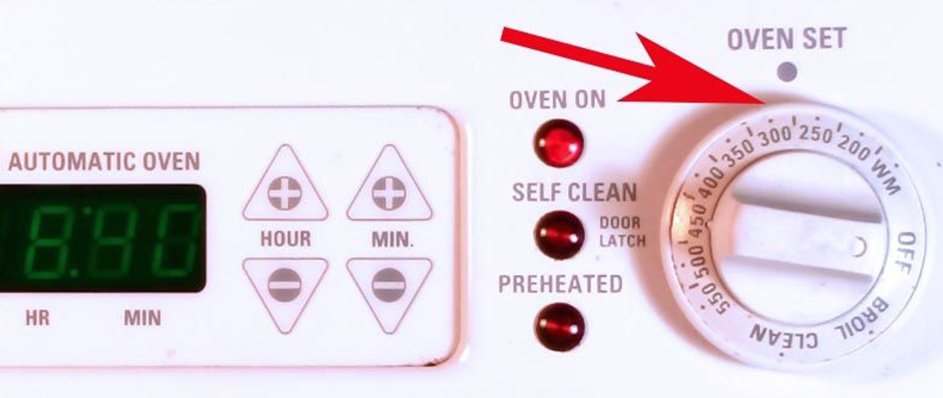
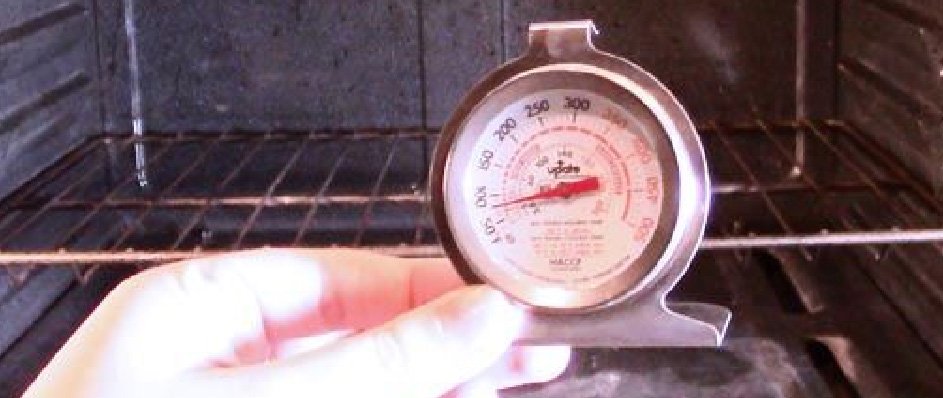
Then, set your oven to the correct temperature (See picture above) and let it preheat. Be aware that the temperature dial on most ovens is wildly inaccurate, so you will be using a separate oven thermometer to get the correct temperature your clay requires for curing. Once your oven has preheated, insert the oven thermometer (See picture below) and adjust the oven accordingly to get the desired temperature.
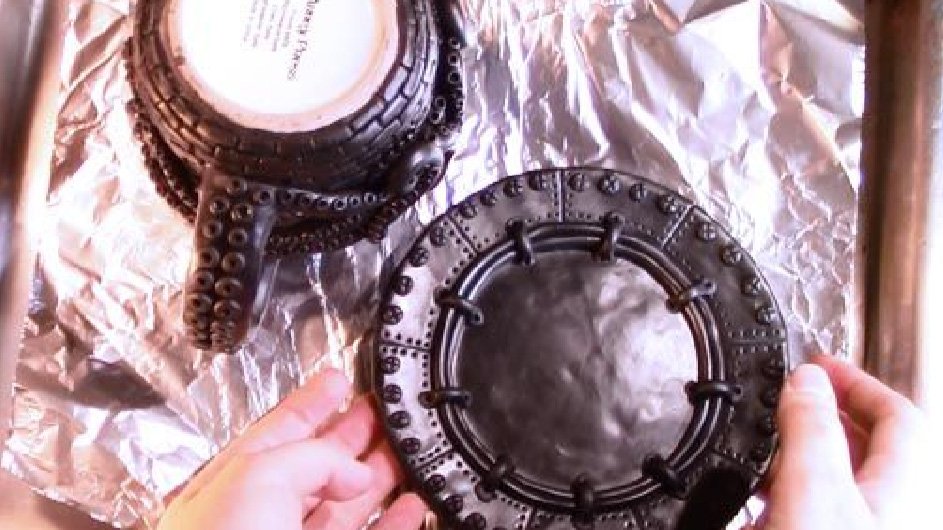
While the oven is adjusting to the right temperature, you can prepare the baking pan that will go in the oven. You can use any metal or glass pan that you use on a regular basis because polymer clay is completely safe and it does not release any toxic fumes. It also does not create a residue in your oven when baked. So, go ahead and use any baking tray you have and place a sheet of aluminum foil on top of it. The aluminum foil will prevent any clay from sticking to the pan. Then, place your mug & plate over the aluminum foil (See picture below).
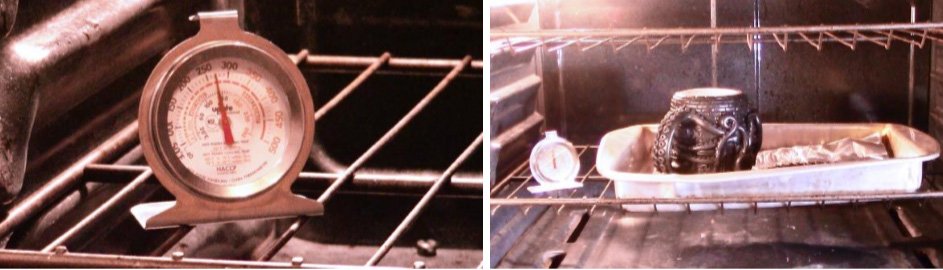
Watch your thermometer through the door and wait until it reaches the desired temperature (See left picture below). Once your oven is stable and at the recommended temperature for a good amount of time, you can insert your mug & plate into the oven (See right picture below).
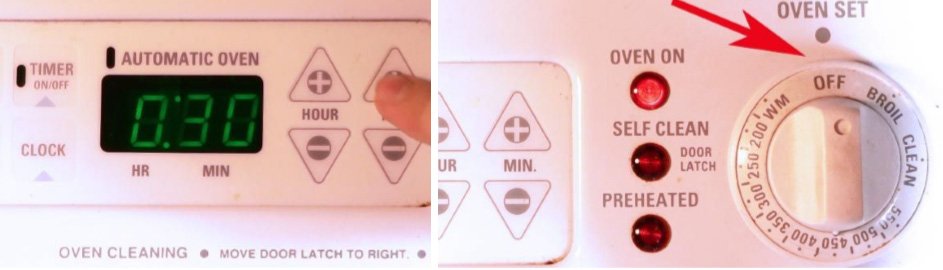
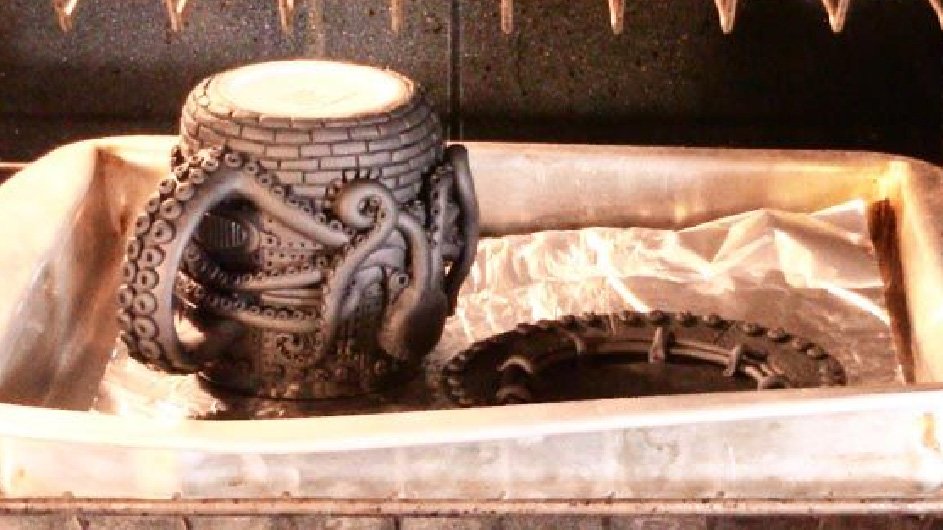
Now, you need to wait 30 minutes (or the recommended baking time for your clay) for your mug & plate to cure. Set your oven timer (See left picture below) and wait until they are ready. Once your timer goes off, you need to turn off your oven (See right picture below).
Then, open your oven door and let your mug & plate cool off slowly inside the oven for another 30 minutes (See picture below). This is the most fragile time for the clay, so make sure that you do not move or touch the mug & clay for these 30 minutes.
After the 30 minutes have gone by, you can remove the pan from the oven and take a look at how your mug & plate came out. You might notice that the clay on your mug & plate is still flexible after baking, which might seem strange, but this is actually normal. If you followed the package?s instructions and this guide?s instructions, your mug should be fully cured and ready to be painted.
And now you?re done with Part 3! Your mug & plate should now have a matte finish after baking it. Go on to Step 4 to learn how to stain them, paint them and apply glaze to them.
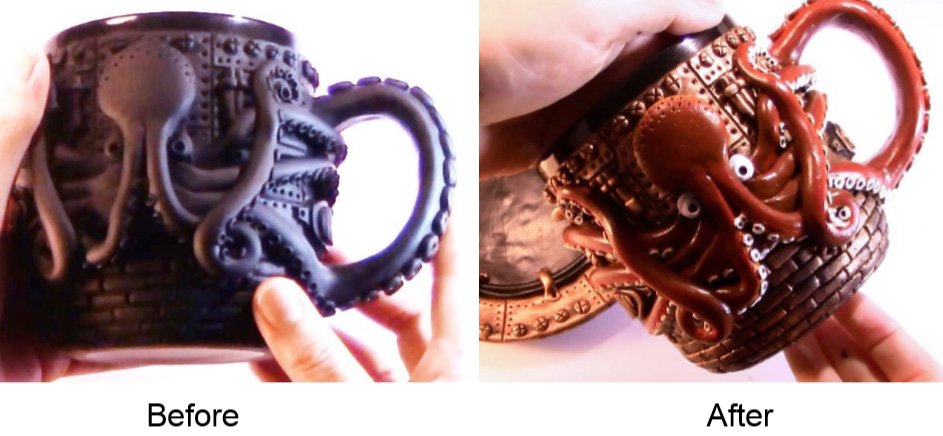
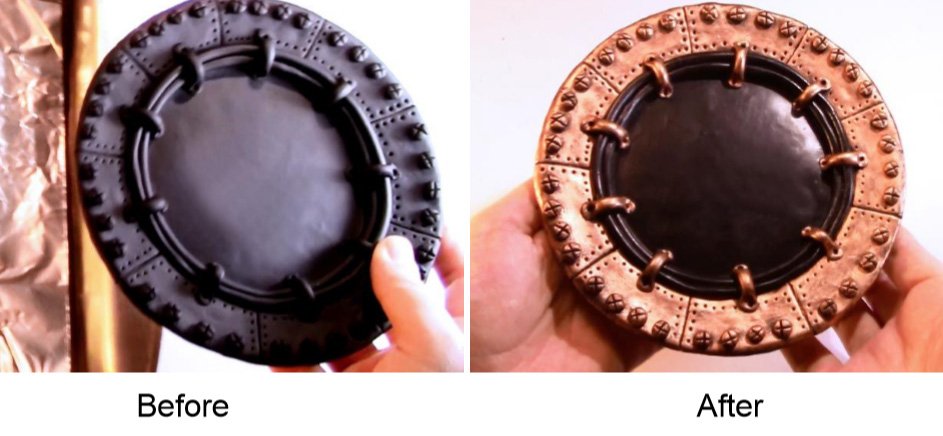
Part 4: Staining, Painting & Glazing
During this part, you will be working on the color of your mug & plate. You will be staining, painting and glazing your pieces to complete your work of art (See before and after pictures below).
Step 19: Staining with Rub n? Buff
For this step, you will need one medium size soft-?haired brush, one small soft-?haired brush, your mug & plate and your ?Autumn Gold? Rub n? Buff metallic wax (See left picture below). First, squeeze out some Rub n? Buff and put a small amount of wax on your medium sized brush. Then, start staining the bottom of your mug with light pressure on the brush (See right picture below). You need to apply light pressure because the black clay should still show through the crevices.
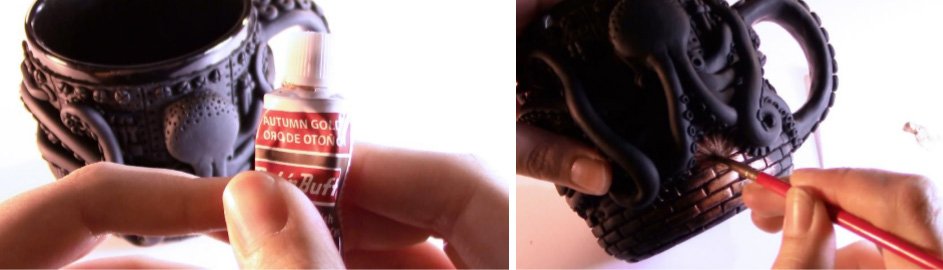
Continue staining the rest of the background with this technique. You will need to cover the entire highlighted part of your complete mug design with Rub n? Buff (See picture below). To keep you from staining the rim of the mug, use the smaller brush to stain the borders and the harder places to reach. Don?t worry too much about getting wax on the octopus because you will be able to cover any mistakes with acrylic paint later on.
After staining the entire background, your mug should look something like this:
Let your mug dry for at least 10 minutes before touching it again. Now, you need to begin staining your plate. Use the medium sized brush to cover the entire rim of your plate with Rub n? Buff (See left picture below). Then flip the plate around and stain the bottom of it (See right picture below).
Let your plate dry for at least 10 minutes before touching it again.
Step 20: Painting with acrylics
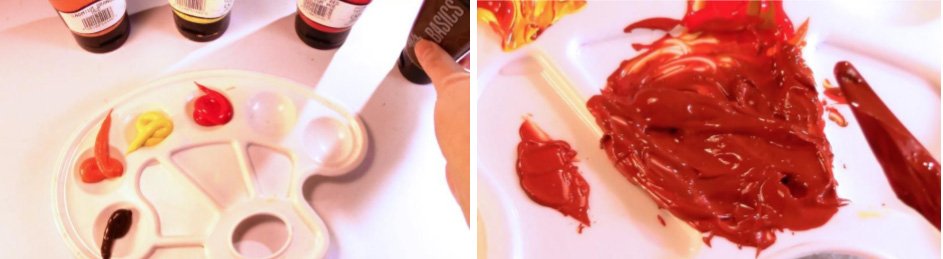
For this step, you are going to need a one very small paint brush, one medium size paint brush, a cup with water, a paint mixing palette, a mixing tool and all of your acrylic paints (Orange, Brown, Red, Yellow, White, Black). First, start by squeezing out a good amount of orange, brown, red and yellow paint onto your mixing palette (See left picture below). Then, make a mix of 60% orange, 20% red, 10% yellow and 10% brown (See right picture below). This will be mix #1.
The dark orange color that you made will be the base color of your octopus. Start by painting mix #1 on the head and the tentacles of the octopus with your small brush (See left picture below ). It is very important that you apply the paint in thin layers. Let the paint dry for at least 10 minutes before you apply the next coat. You can use the medium sized brush on the second layer (See right picture below).?
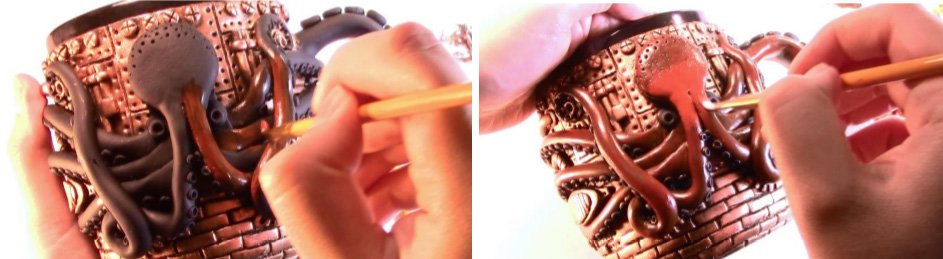
After a couple coats of paint, your mug should look something like this:
The next mix you are going to make will be 70% orange, 15% red, 10% yellow, 5% brown. Mix #2 will be lighter than mix #1. Make sure you clean your brushes in the cup of water before using another mix. Then, apply a couple layers of mix #2 around the suckers on the tentacles (See left picture below) and on top of the octopus head (See right picture below).
Now, you need to use yellow paint on the crevices between each sucker (See left picture below). Make sure you also add the yellow to the handle of the mug (See right picture below).
Next, squeeze out white paint onto your mixing palette. Now, paint the top of the suckers with white paint (See left picture below). You will need your very small brush to be able to do this carefully. Take your time and don?t get white anywhere else on the octopus. If you do, wait for the paint to dry and cover the mistakes with the corresponding color. Paint the eyes of the octopus white with your small brush too (See right picture below).
Your mug should look something like this:
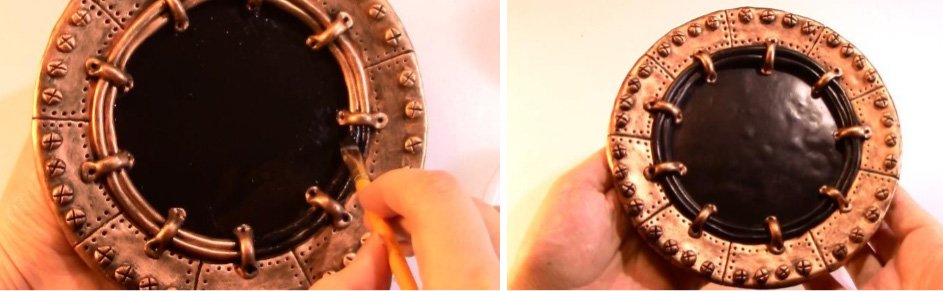
Now, squeeze out some black paint onto your mixing palette and paint the center of the plate and the two snake?like ?tubes? with it (See left picture below). Apply a couple coats if needed. After the paint dries, your plate should look something like this (See right picture below).
Let your mug & plate completely dry before you move onto the next step.
Step 21: Glazing your mug & plate
In this last step, you will be making your mug & plate water resistant! This way you will be able to hand?wash your pieces as many times as you need and the paint will not come off. After your painted mug & plate have completely dried from the paint, you will be able to glaze them. You will need your Sculpey ?Satin Glaze?, your Sculpey ?Gloss Glaze? and one medium sized brush for this step.
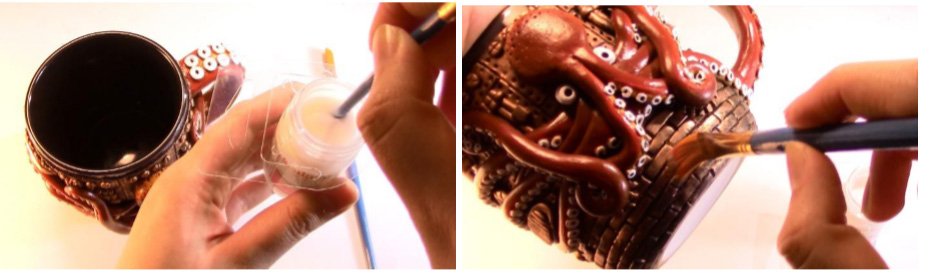
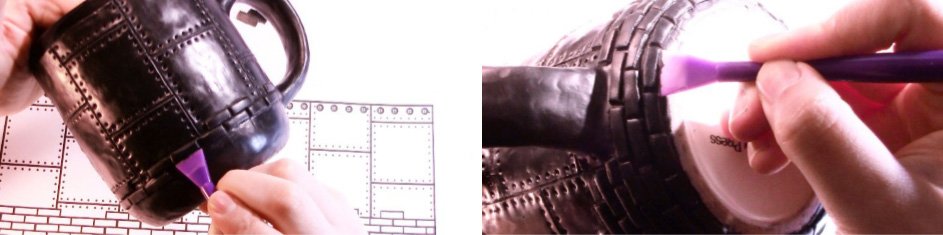
Start by slowly mixing the ?Satin Glaze? with the back of your brush (See left picture above). Mix it well, but do not shake the bottle. Then, grab a small amount of glaze with your brush and start brushing the glaze onto the background of the mug (See right picture above & left picture below). You will be covering the entire background covered with Rub n? Buff in two coats. To avoid the glaze peeling from your mug later on, make sure you only add thin coats of glaze each time.
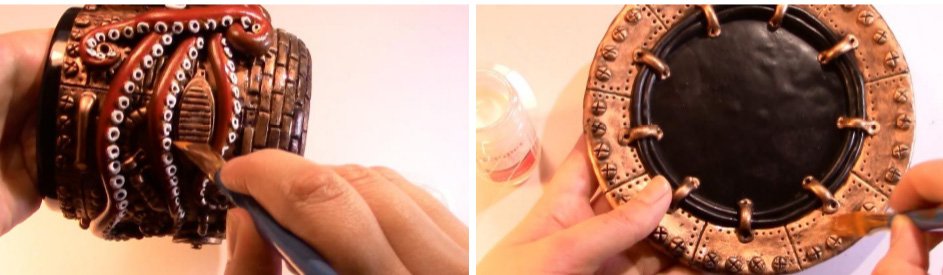
Also, it is very important that you wait at least 30 minutes for the glaze to dry before applying another coat on top. While you are waiting for the first coat of ?Satin Glaze? to dry on your mug, brush the first coat of ?Satin Glaze? on the rim of your plate (See right picture above). Then, do a second coat on both the mug & plate. Do not cover any black parts on the plate with this glaze.
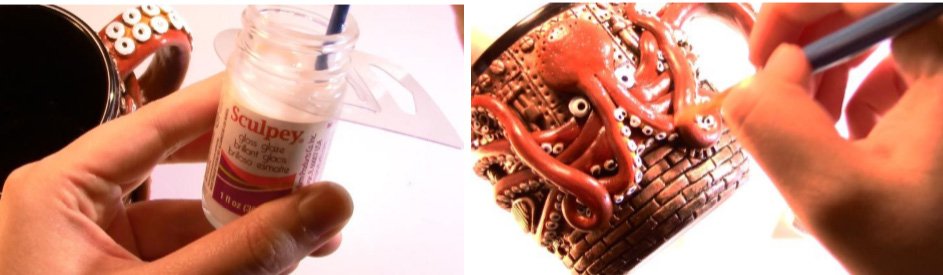
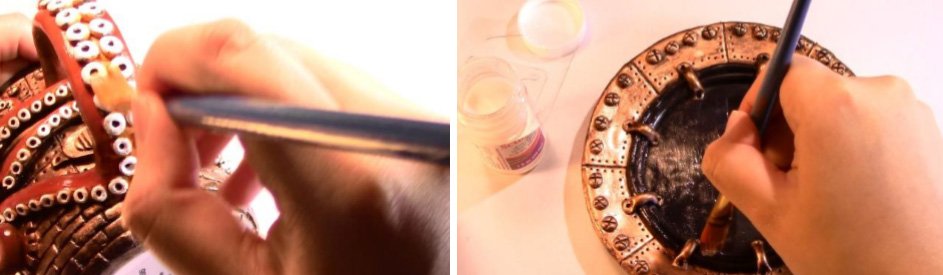
Now, clean your brush and start mixing the ?Gloss Glaze? with the back of your brush (See left picture above). Then, cover the entire octopus (See right picture above & left picture below) and all the black parts of the plate with this glaze (See right picture below). Apply two or three coats of this glaze depending on how shiny you want the octopus to be. Make sure that you also wait 30 minutes between each coat when you?re using this glaze.
After you have applied all your coats of glaze, put your pieces in a safe spot in your house. You will not need to bake your pieces again. All you have to do is wait 24 hours for the glaze to completely dry and your mug & plate will be water resistant and ready to use!
You are now done with Part 4 and you have completed my guide!
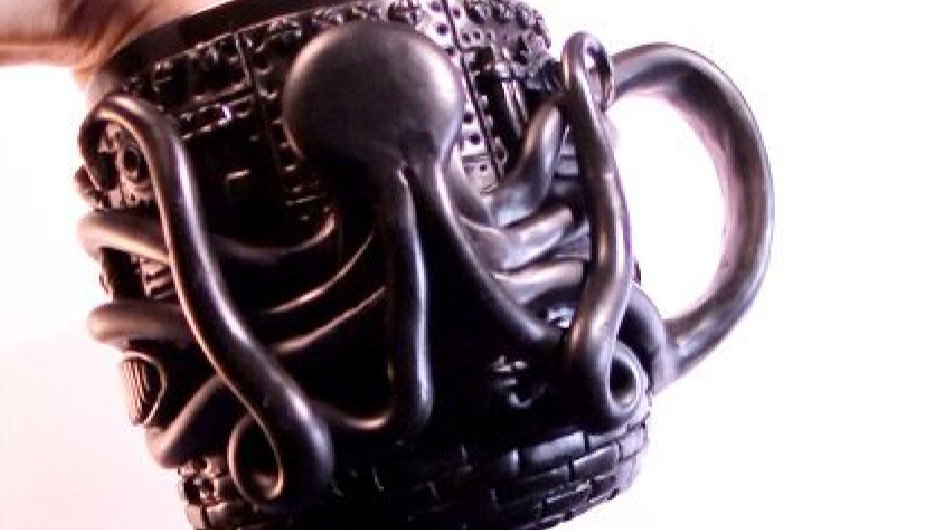
Step 22: Take pictures of your new mug & plate!
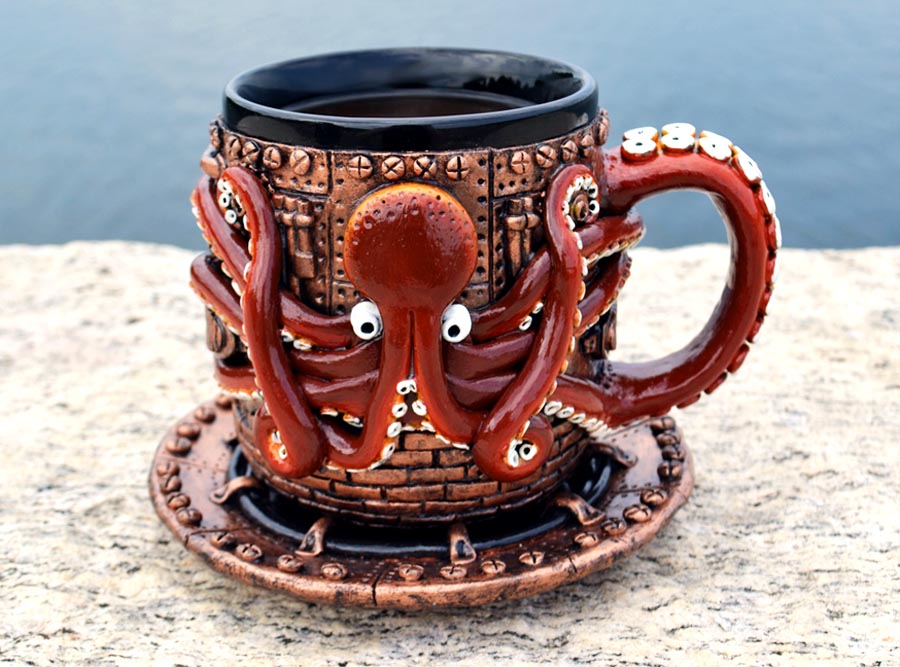
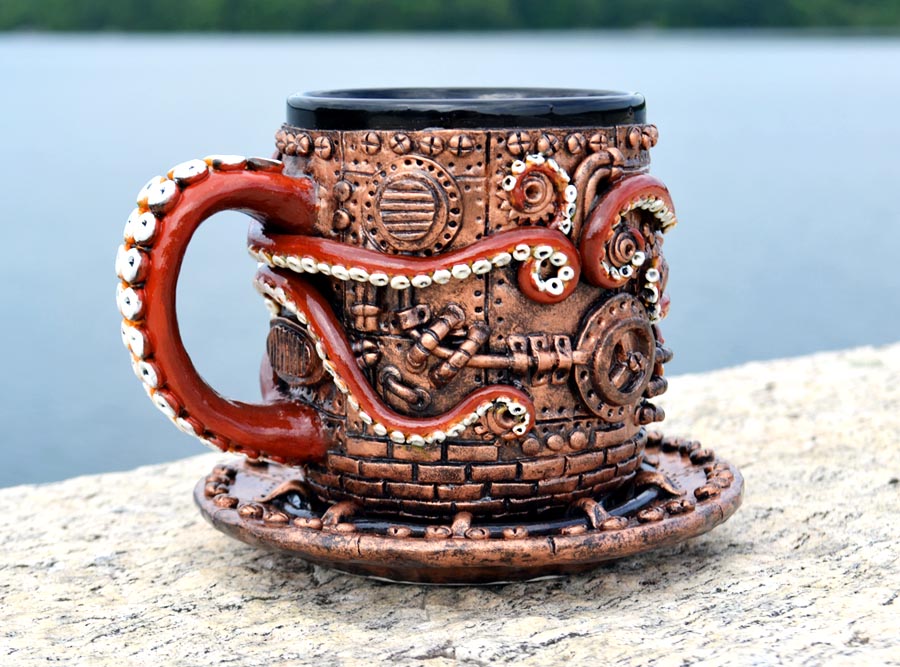
Nothing makes me happier than waking up to coffee out of my Kraken Mug.